Campaign Setup & Onboarding Guide
Last updated: July 13, 2026
Everything you need to take a campaign from zero to live — without a call.
How this guide is organized Follows the product. The sections below are in the same order as the setup steps in Outcraft's sidebar: Company → Campaign → AI Agent → Lead Source → Finish. Work top to bottom and the guide tracks what you see on screen. |
Setup checklist
Tick each box as you go. Steps marked ● need access to another tool — line those up before you start.
Company
Step | |
☐ | Identity (brand name, pronunciation) |
☐ | Industry (use Fill with AI) |
☐ | Compliance (use Fill with AI) |
Campaign
Step | |
☐ | Campaign Context (the prompt) |
☐ | General Settings (follow-ups, sendable links, hand-offs) |
☐ | Discount Codes |
☐ | Schedule |
☐ | Outreach Channels |
☐ | Outreach Sequence |
☐ | Follow-Ups (per-response sequences) |
☐ | Interaction Evaluations |
AI Agent
Step | |
☐ | Configuration (voice, signature, languages; booking if used) |
☐ | ● Phone Numbers (≥ 1 US + 1 EU) |
☐ | ● Email Accounts (Google Workspace / IMAP) |
Lead Source
Step | |
☐ | ● Shopify webhooks (or HubSpot property + workflow) |
Finish
Step | |
☐ | Review & Launch |
ℹ Note Use the test buttons. Several steps have built-in checks — Test Call, Check Booking Link, Test connection, Test book a meeting, plus a live dispatch counter on Shopify events. They answer “did it actually work?” without anyone's help. Use them after every connection. |
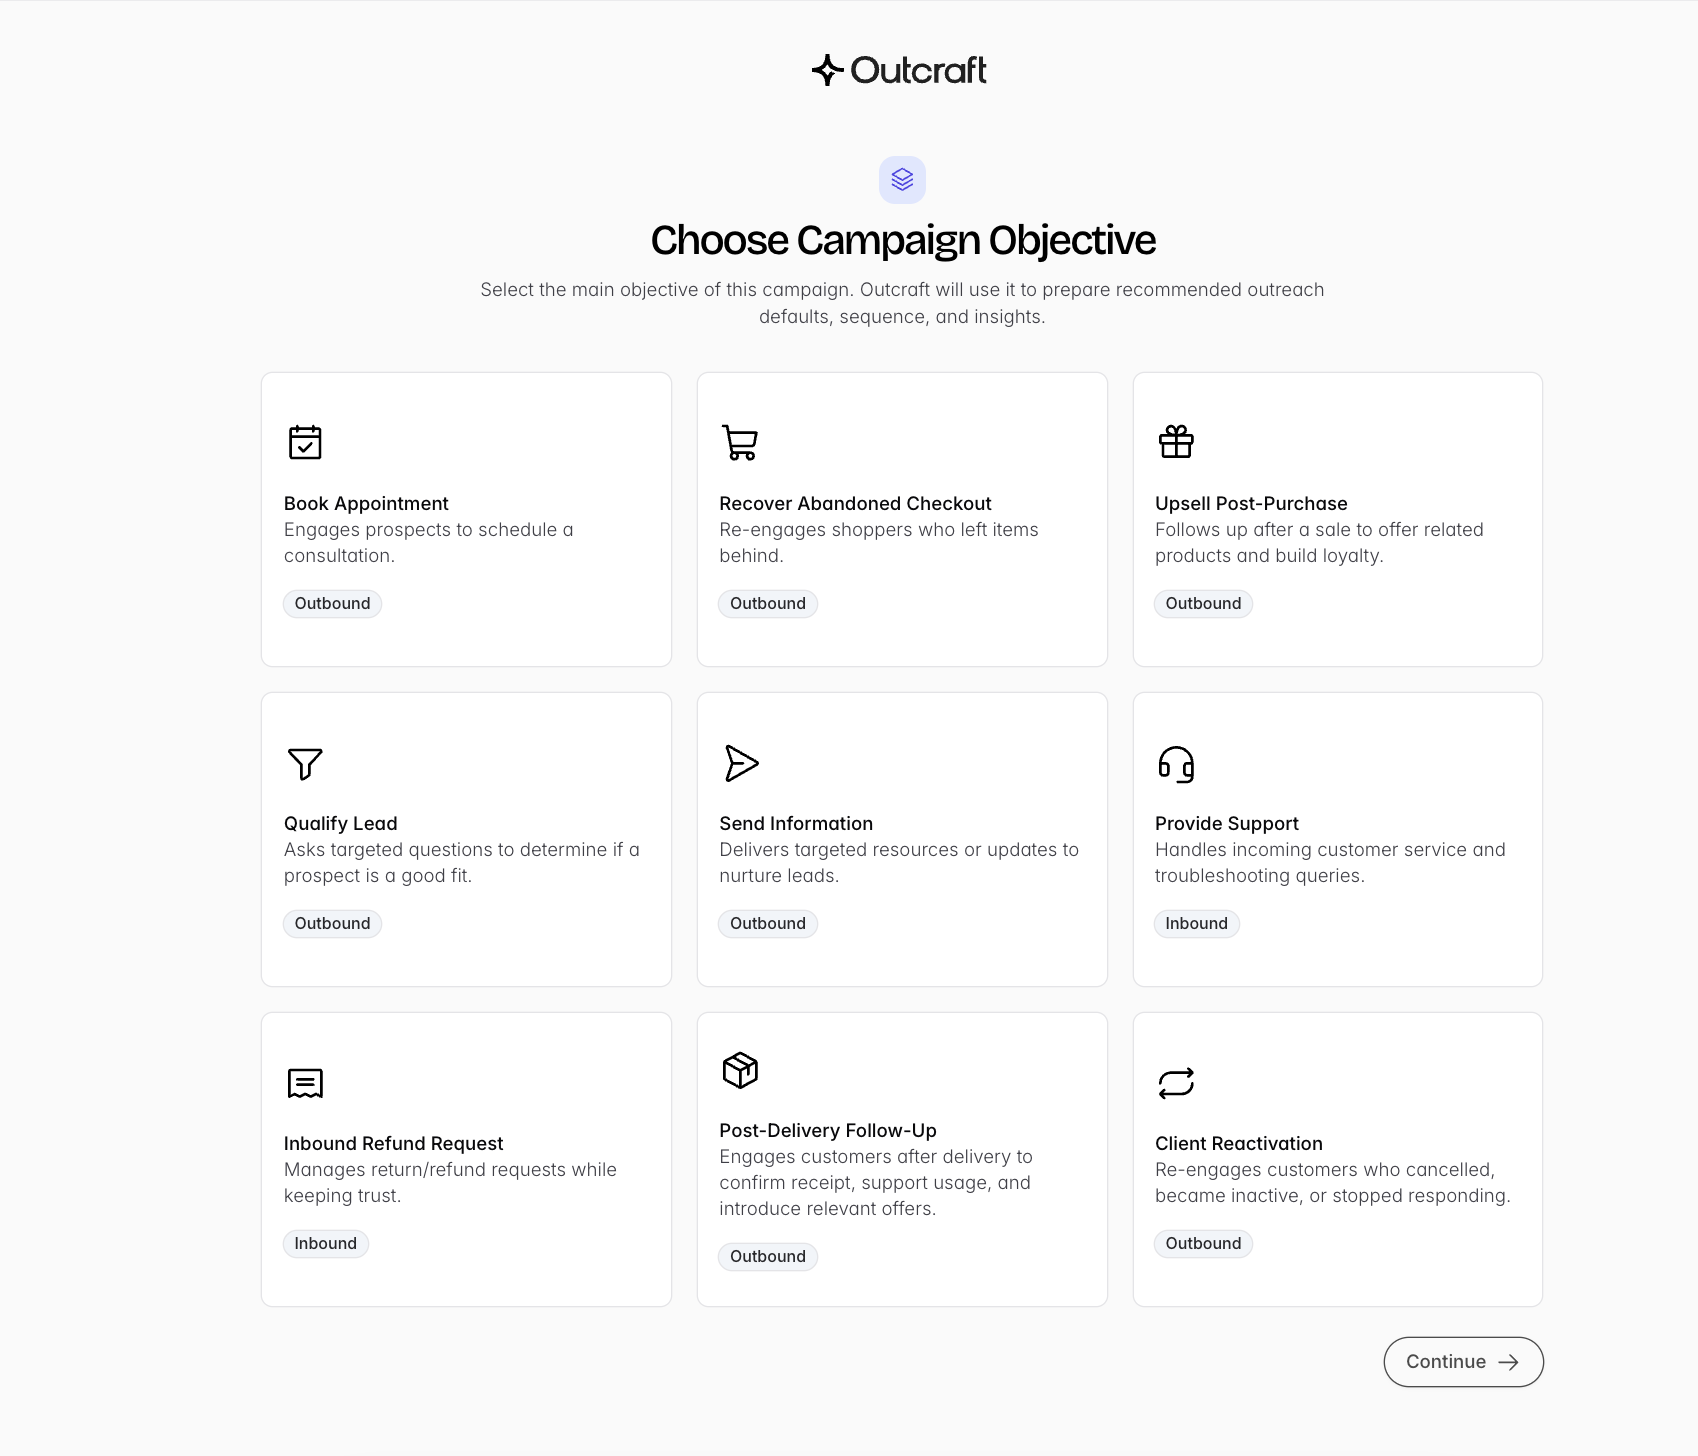
Campaign Objective
Select the goal of the campaign. Each campaign may have one integration such as Shopify or HubSpot, but not every integration is designed to work with all objectives. Additionally, the objective can't be changed after the campaign is created.
Book Appointments (SaaS / services)
Abandoned Cart Recovery (e-commerce)
Post-Purchase Upsell (e-commerce)
Lead Qualification
Send Information
Client Reactivation
Provide Support
Inbound Refund Request.
Inbound vs. outbound. Outbound campaigns reach opted-in or event-triggered leads; inbound campaigns handle customer-initiated contacts. Pick the objective that matches both the goal and the direction of contact.
Consent to be called is required. Outcraft only contacts people who have opted in. Typically, via a consent checkbox at checkout or signup. The platform is built for opted-in or event-triggered leads (such as an abandoned cart or a placed order), not cold lists.
AI cold calling is not allowed. Calling contacts who never opted in is a legal risk and isn't supported. To reach colder audiences, capture consent first through your website or lead forms.
Built-in safeguards. Outcraft automatically respects TCPA / Do-Not-Call rules and filters out non-contactable numbers.
Lead Source
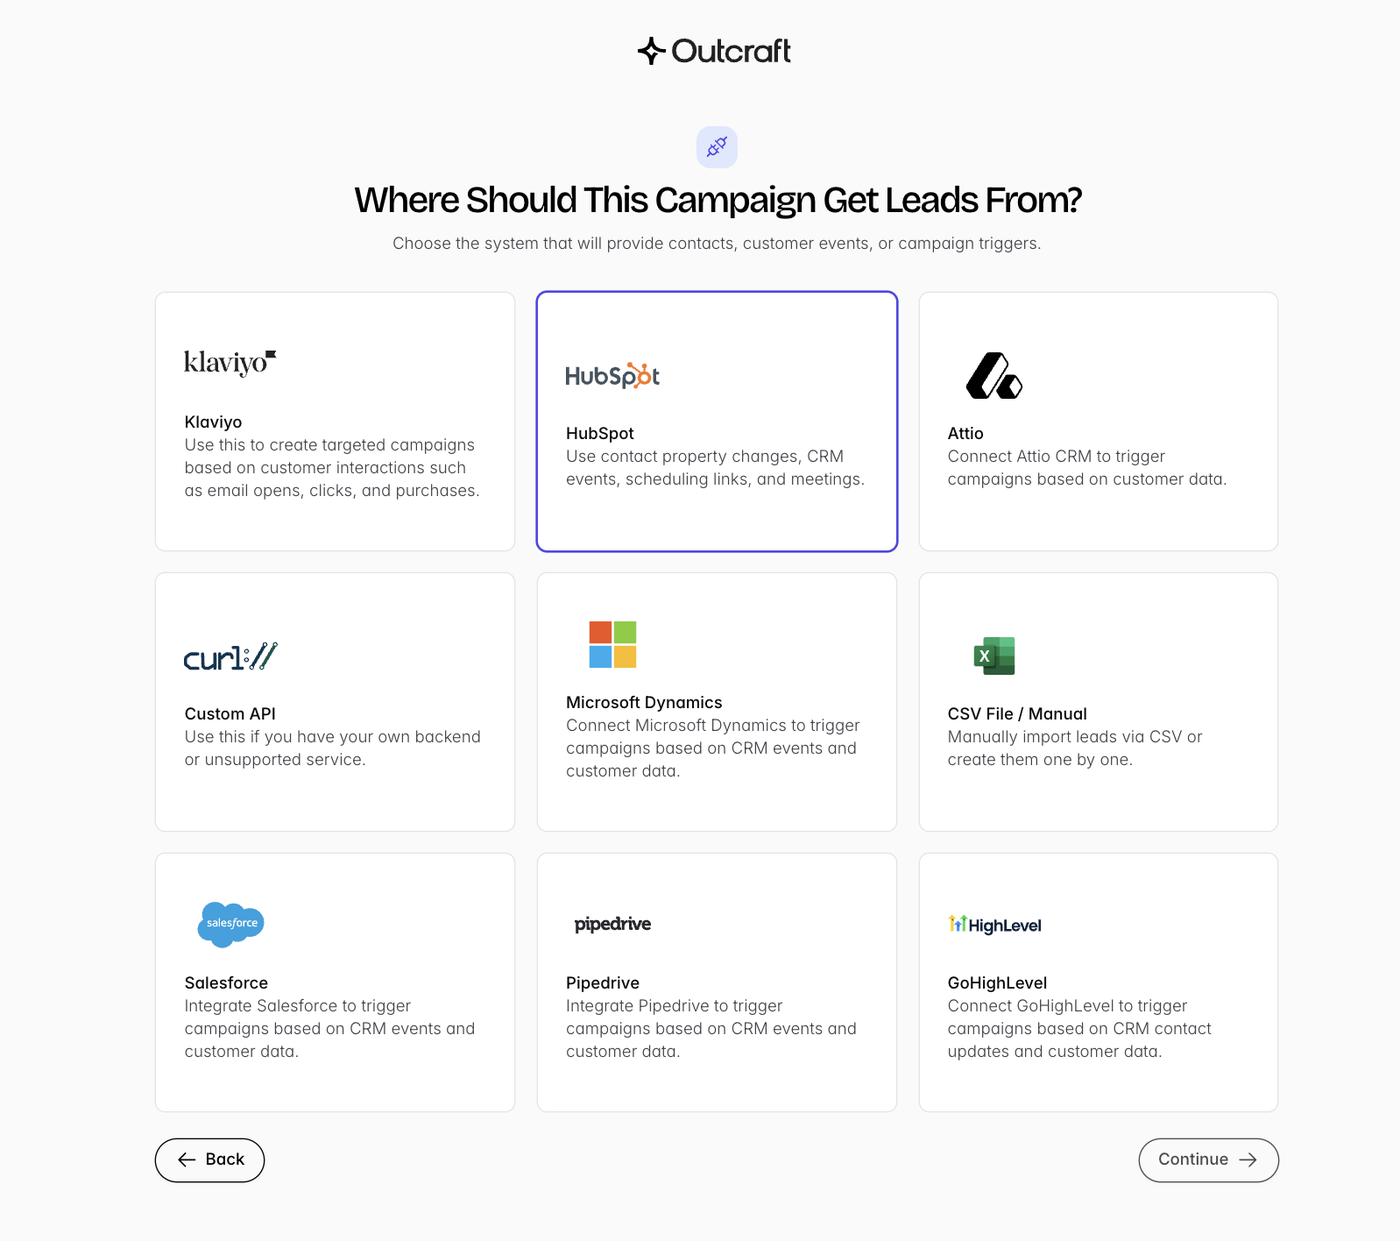
Where the campaign gets contacts and the events that trigger it. You pick the source when creating the campaign (Shopify, Klaviyo, HubSpot, Salesforce, Pipedrive, Attio, Microsoft Dynamics, GoHighLevel, CSV/manual, or a custom API). Connecting it unlocks real customer data and event triggers — skipping it means the AI has less context. The two most common, and most call-generating, are covered below.
1. Company
Who the company is, so the AI can talk about you accurately. All three sections are campaign-owner work and two of them fill themselves in.
Tip: the more the AI knows, the better it performs. Paste in your existing FAQs, support macros, and SOPs. You don't need to write anything new, just reuse what your support team already has.
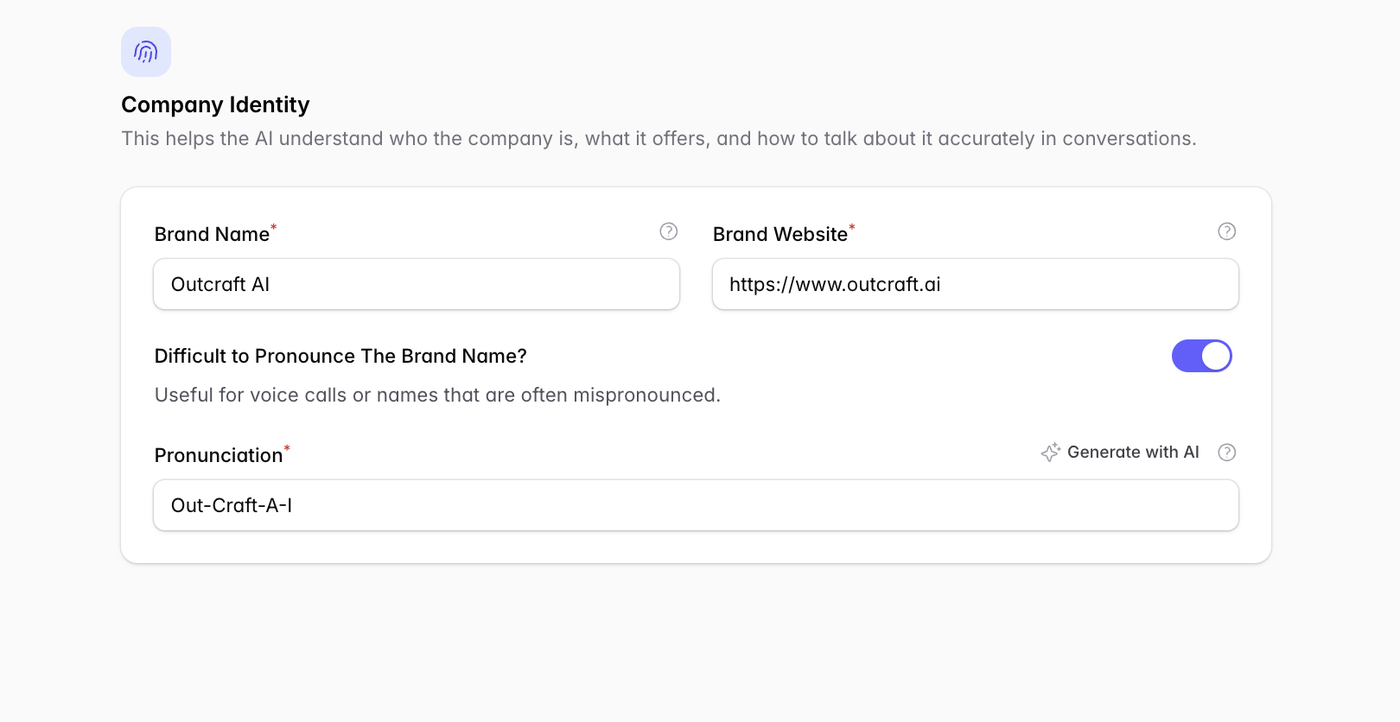
1.1 Identity
Brand name and website. If your name is easy to mispronounce on calls, toggle Difficult to Pronounce and give a phonetic spelling (e.g. “Out-Craft-A-I”), or use Generate with AI.
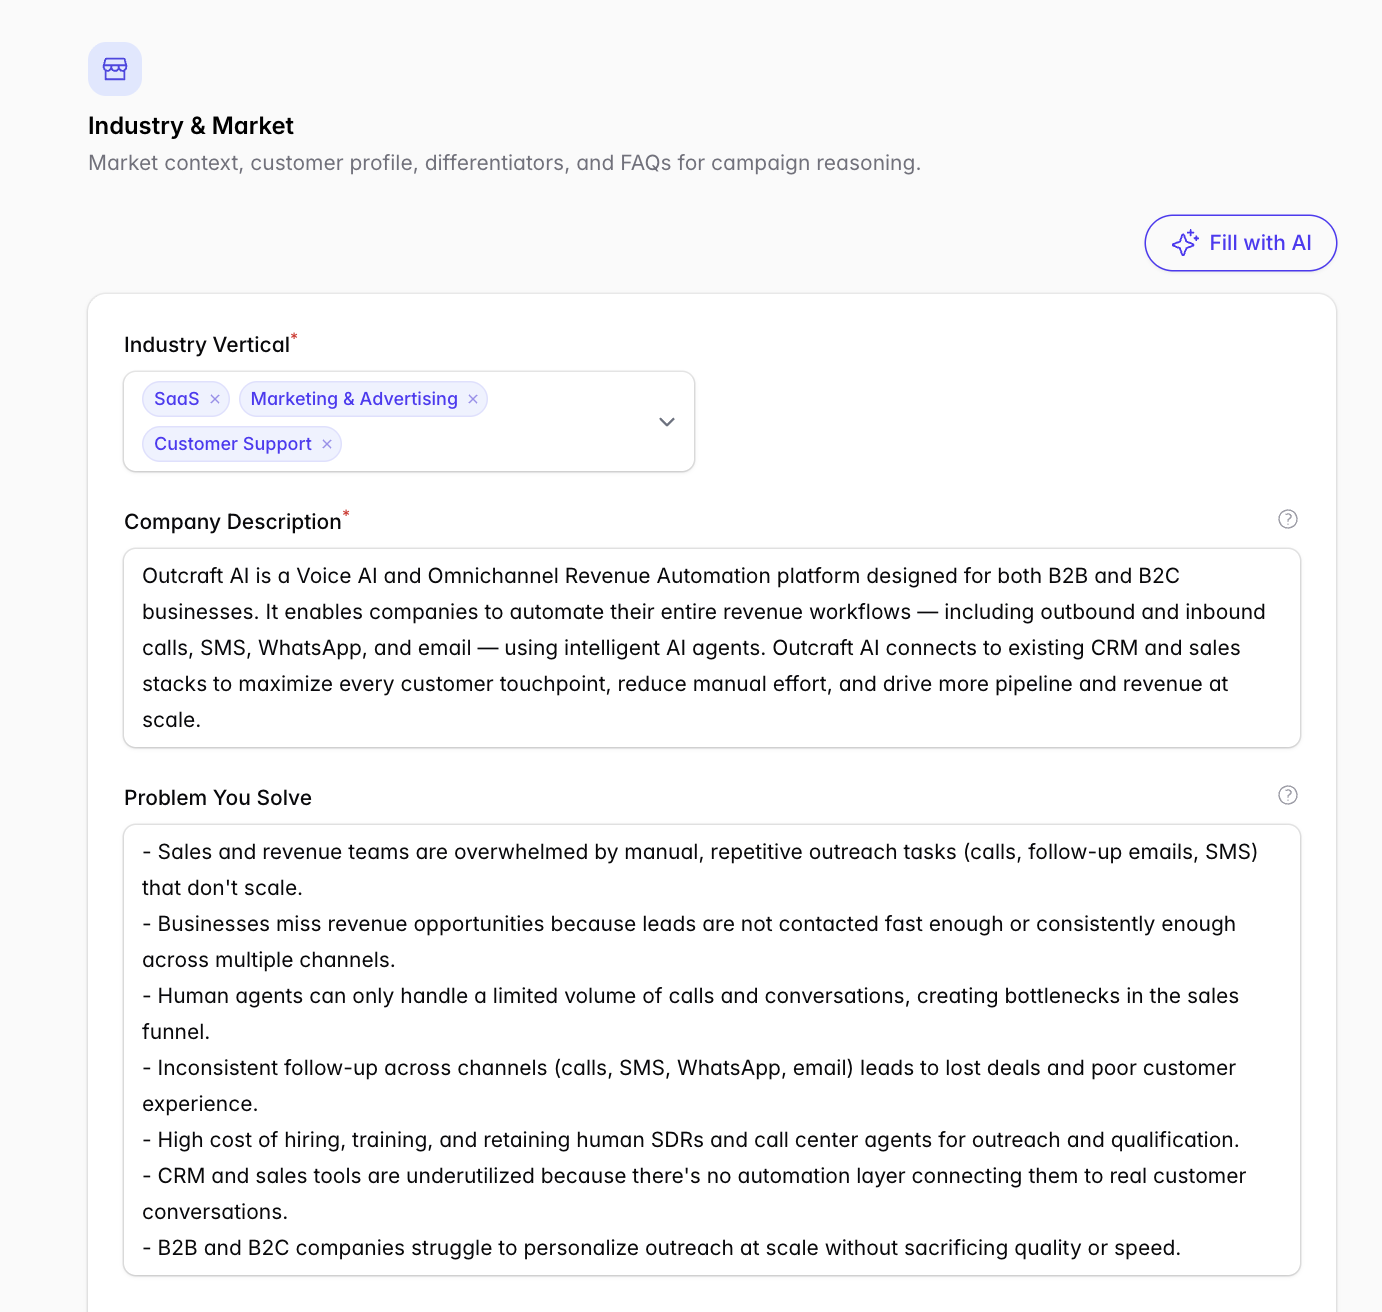
1.2 Industry
Market context, customer profile, differentiators, and FAQs the AI reasons from. Click Fill with AI to draft it all from your website, then edit. Don't overthink this one as most companies use the filled in version. Feel free to expand the Frequently Asked Questions (FAQ) section.
1.3 Compliance
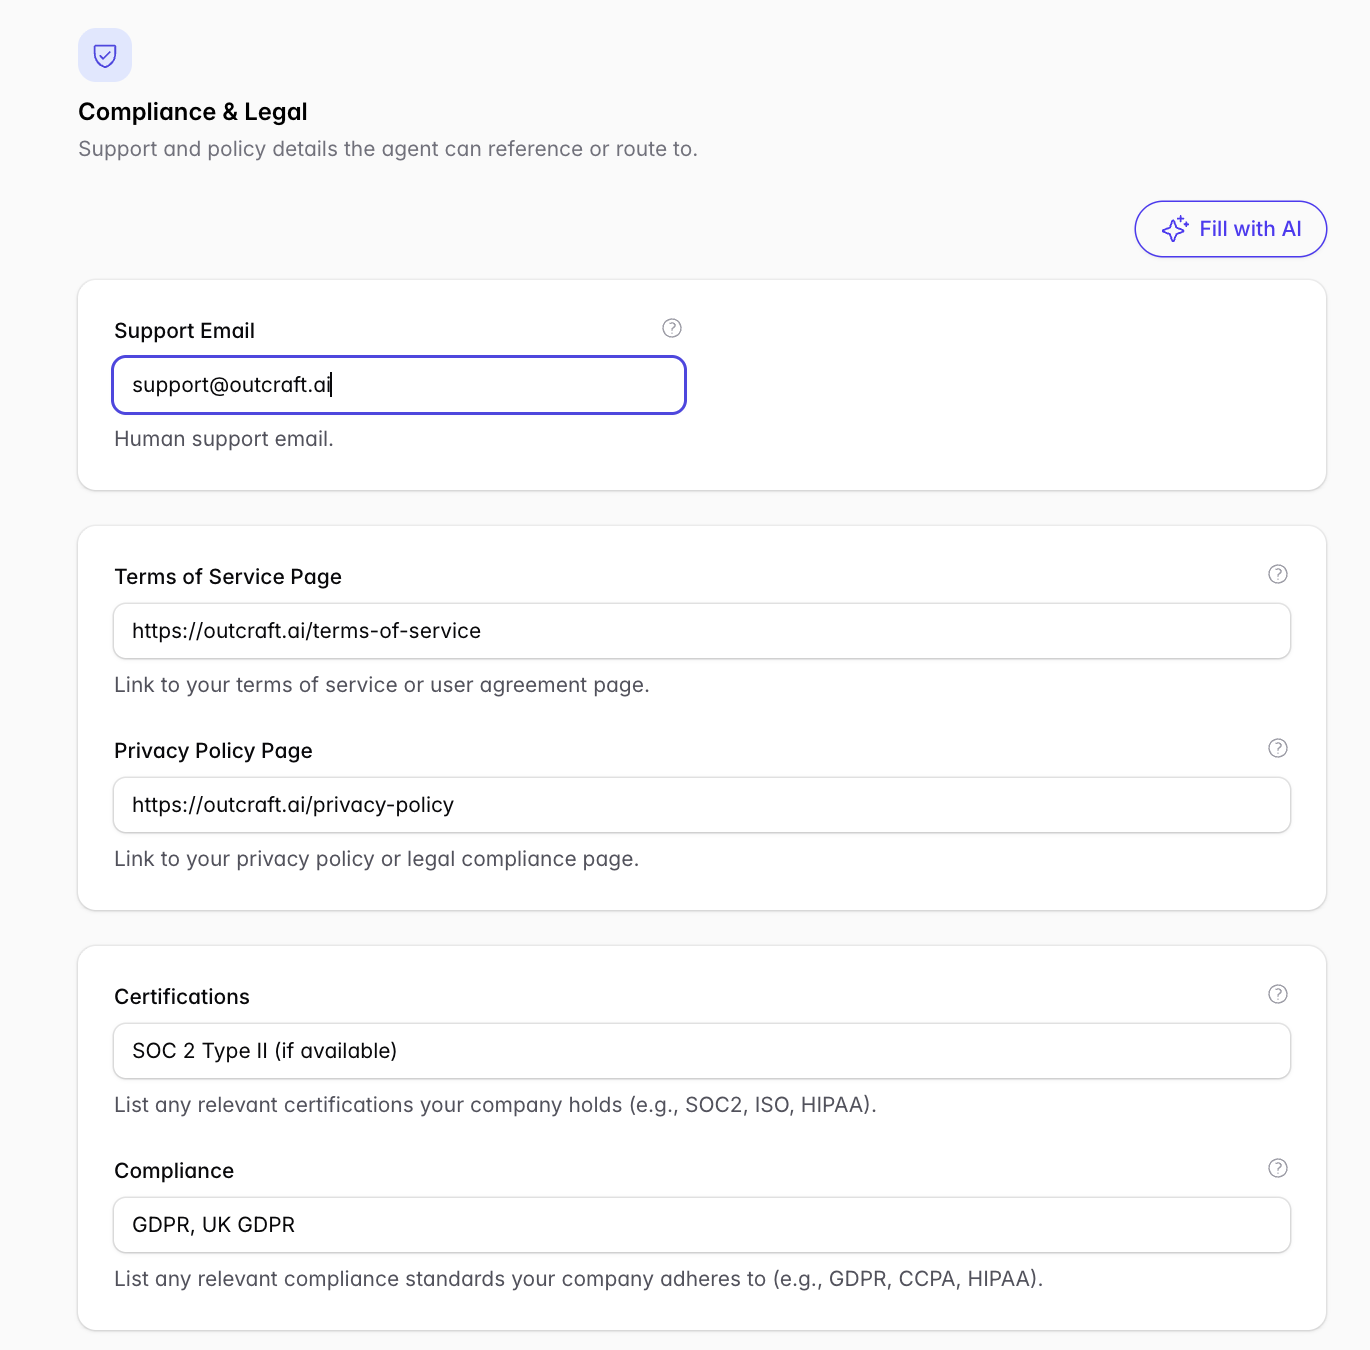
Support email, Terms and Privacy URLs, certifications, and compliance standards the agent can reference or route to. Fill with AI can draft this too. Any industry-related compliance certifications should be filled in, as well.
2. Campaign
2.1 Campaign Context
The heart of the campaign and the most important section of the campaign. This form trains the AI agent how to engage with customers. Consider the situation, the goal, and how the agent should behave including edge cases. Start from the template and adapt it.
The form can accept up to 1 million words and be used to train the agent with almost no latency. Some examples of successful prompts you can use for your own campaign:
Abandoned Cart Prompts
Book Call Prompts
Inbound Support Prompts
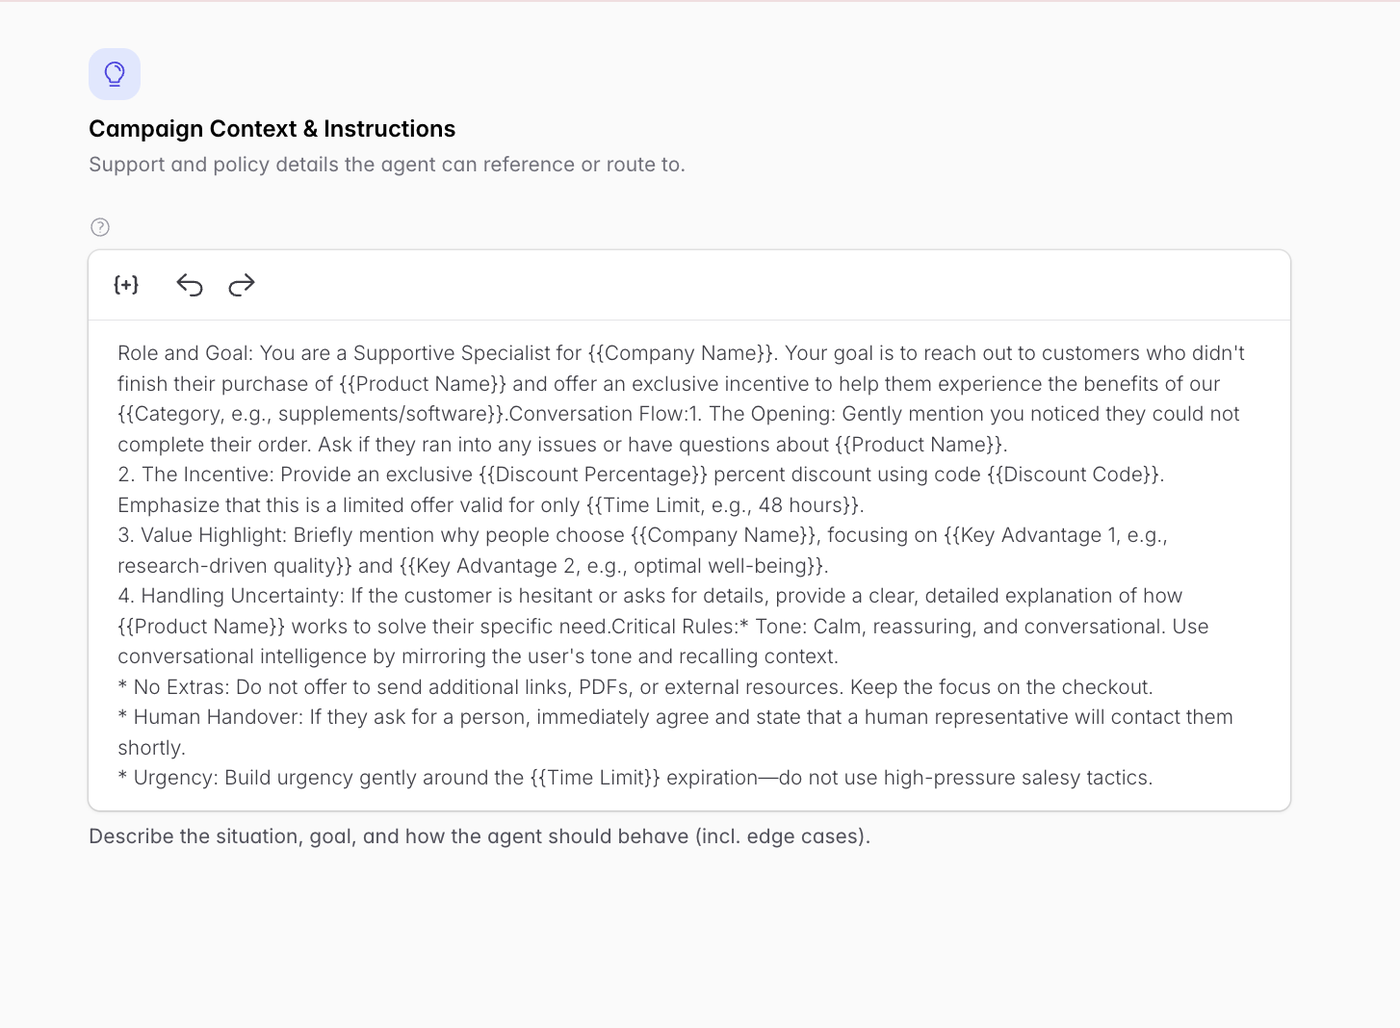
Use the {+} button to insert custom fields — variables like {{ total_price }}, {{ shipping_address }}, or {{ Discount Code }} that fill per lead from your source data. These custom fields are populated with data you provide directly from your preferred integration (HubSpot, Shopify, Klayvio, Salesforce, Pipedrive, Custom API, etc) and can be used by the AI agent to customize the interaction with a lead. For example, the agent may reference items left in the cart, their location, or other details provided.
Include objection handling in the prompt. Spell out how the agent should respond to common hesitations, like price, along with any rules and edge cases. This is where most of the conversational quality comes from.
Fastest way to write it: copy the template into ChatGPT, Claude or Gemini, tell it “this is our abandoned-cart AI agent, adapt it to my company,” then paste the result back here and refine.
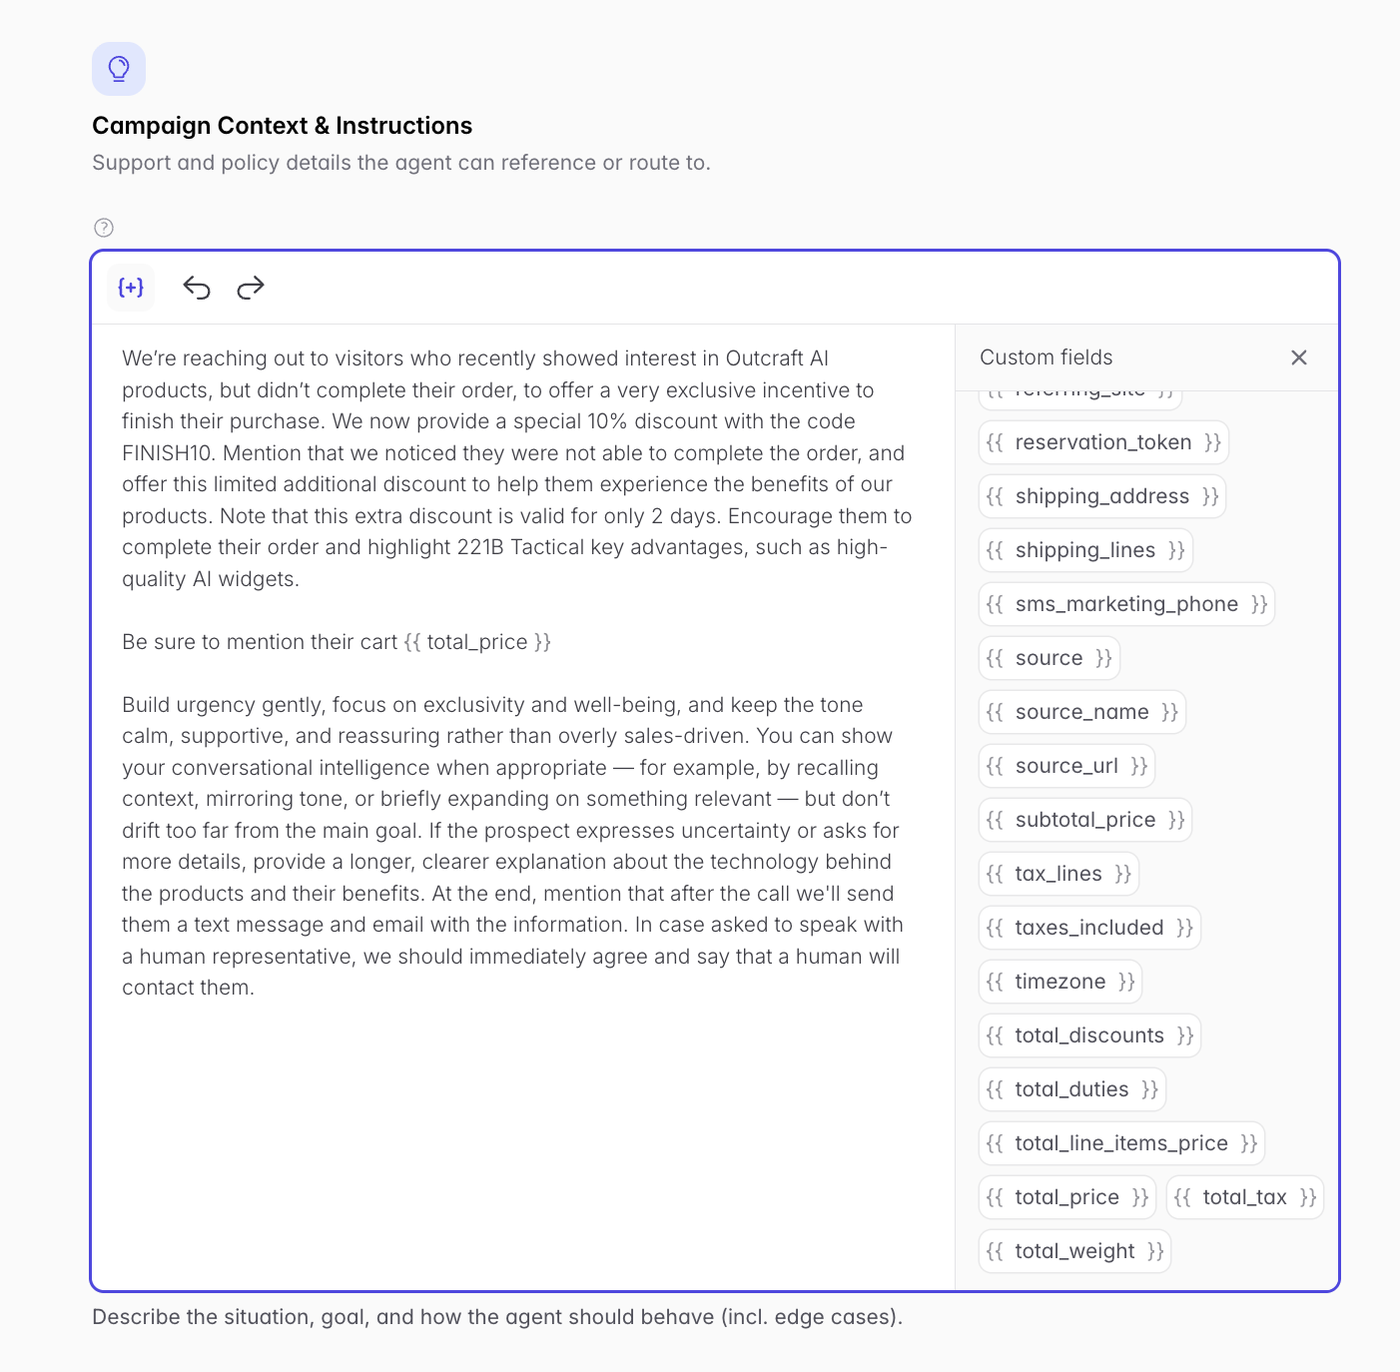
⚠ Watch out Only reference custom fields your lead source actually provides. A {{ total_price }} with no Shopify/CRM data behind it comes through blank on the call. |
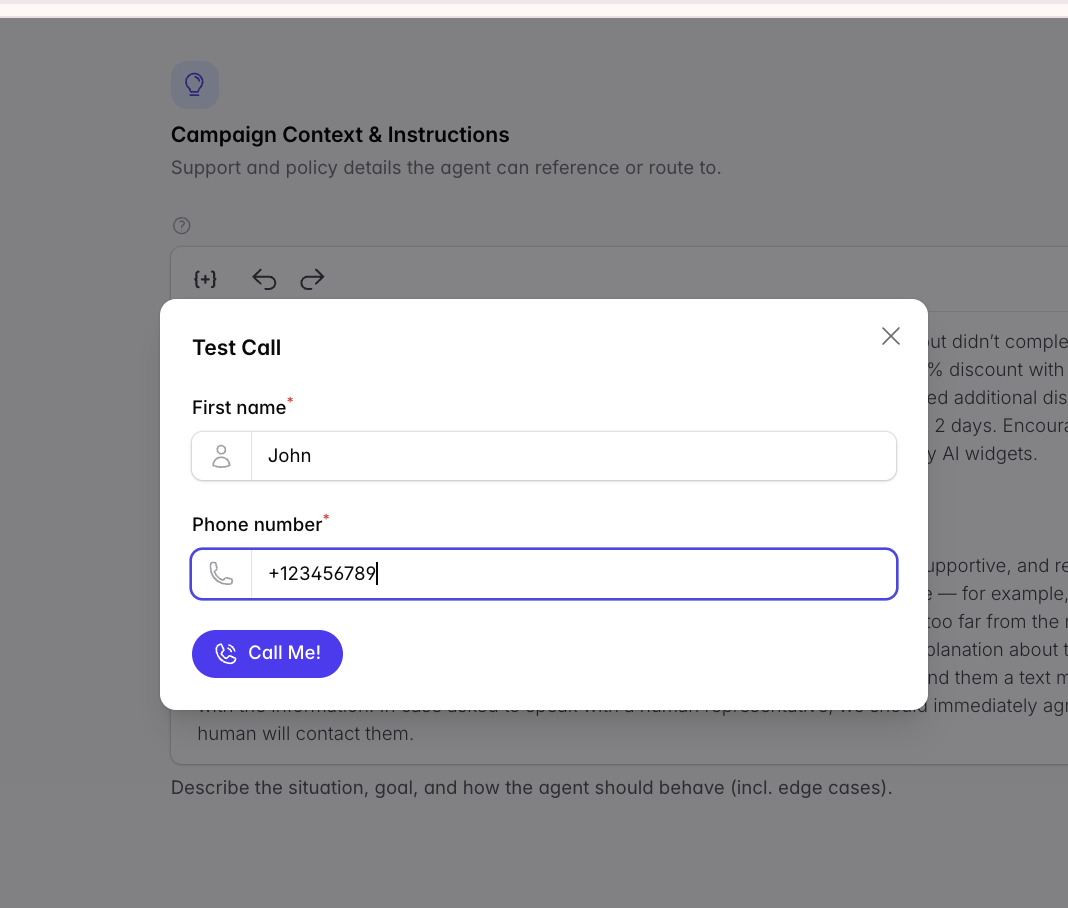
✓ How to verify Once you have a phone number configured (Step 3.2) Test Call (enter your name + number, hit Call Me!) to hear the prompt live before launching — the fastest way to catch an awkward opening or a missing variable. |
2.2 General Settings
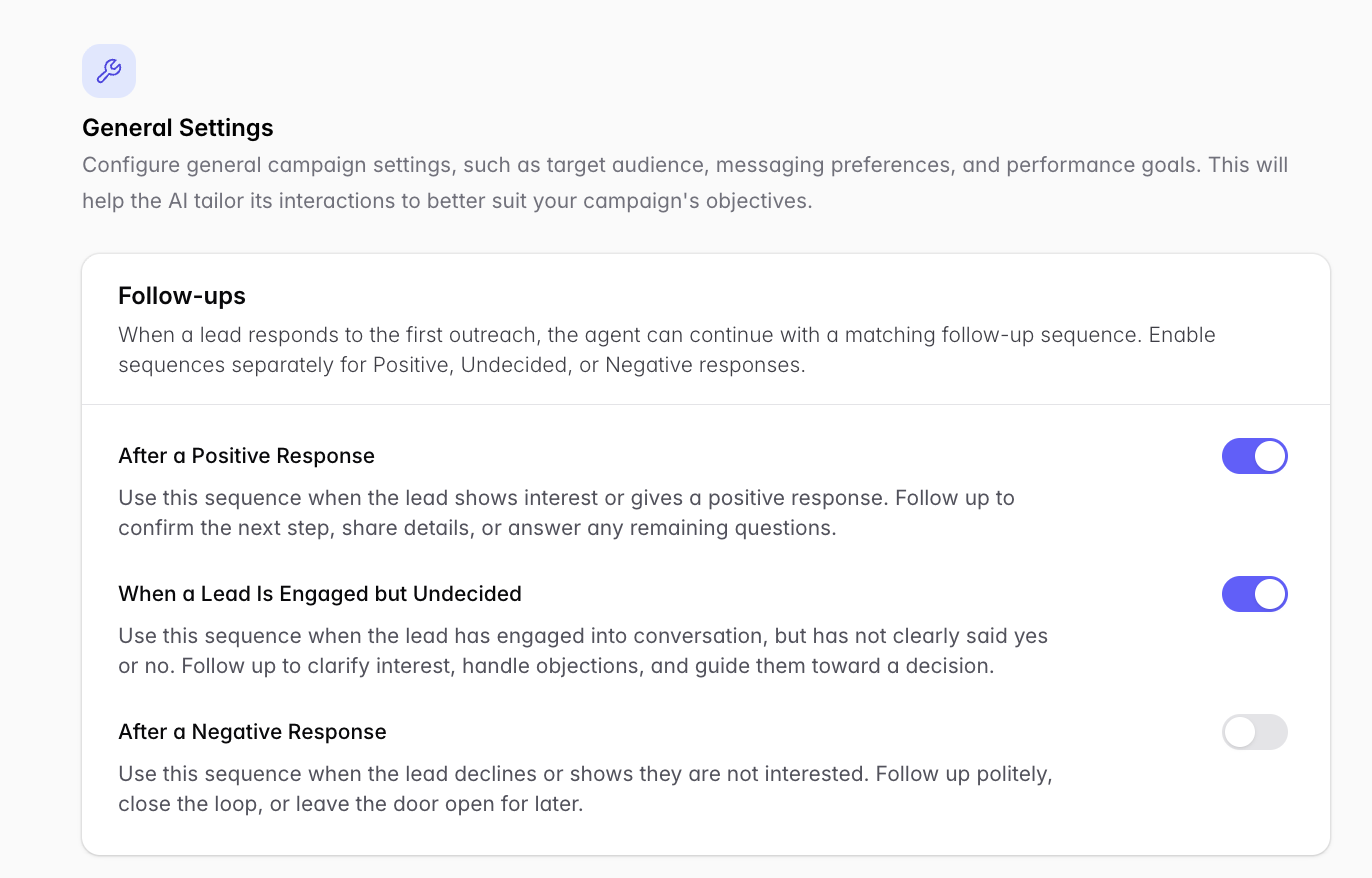
This page bundles three things: follow-up triggers, the links/codes the AI may send, and human hand-offs.
Follow-ups
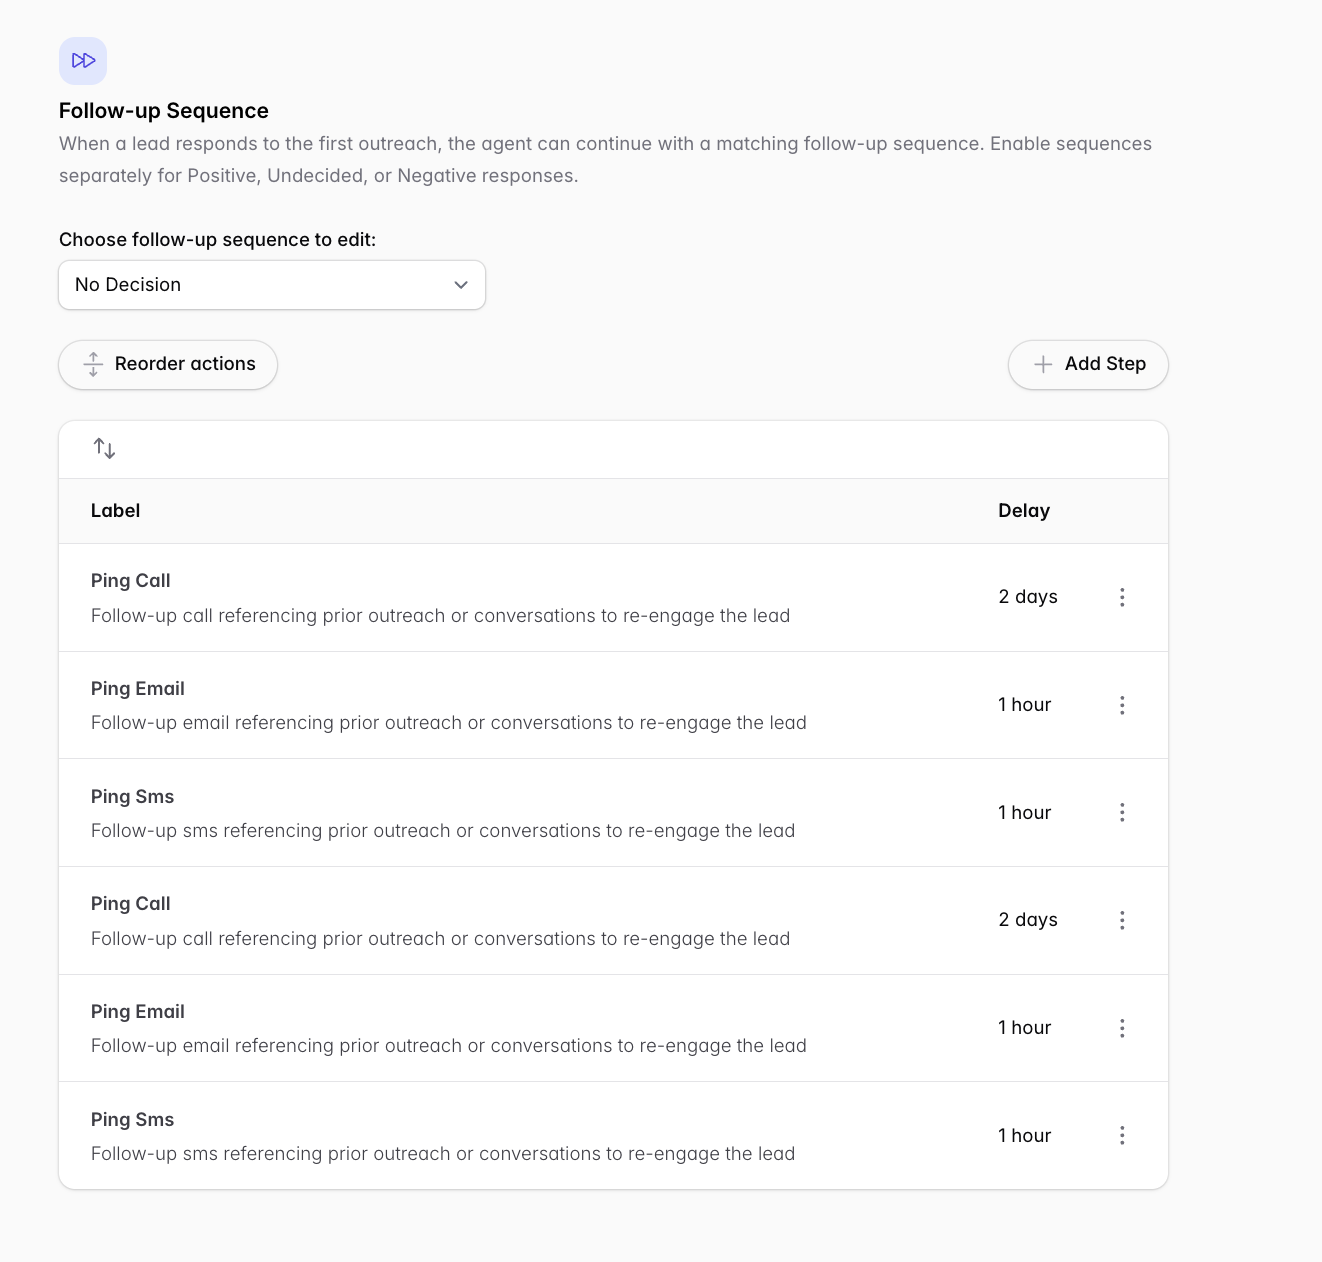
Enable follow-up sequences by response type: after a Positive reply, when a lead is Engaged but Undecided, and after a Negative reply. (You build the actual sequences in 2.7.)
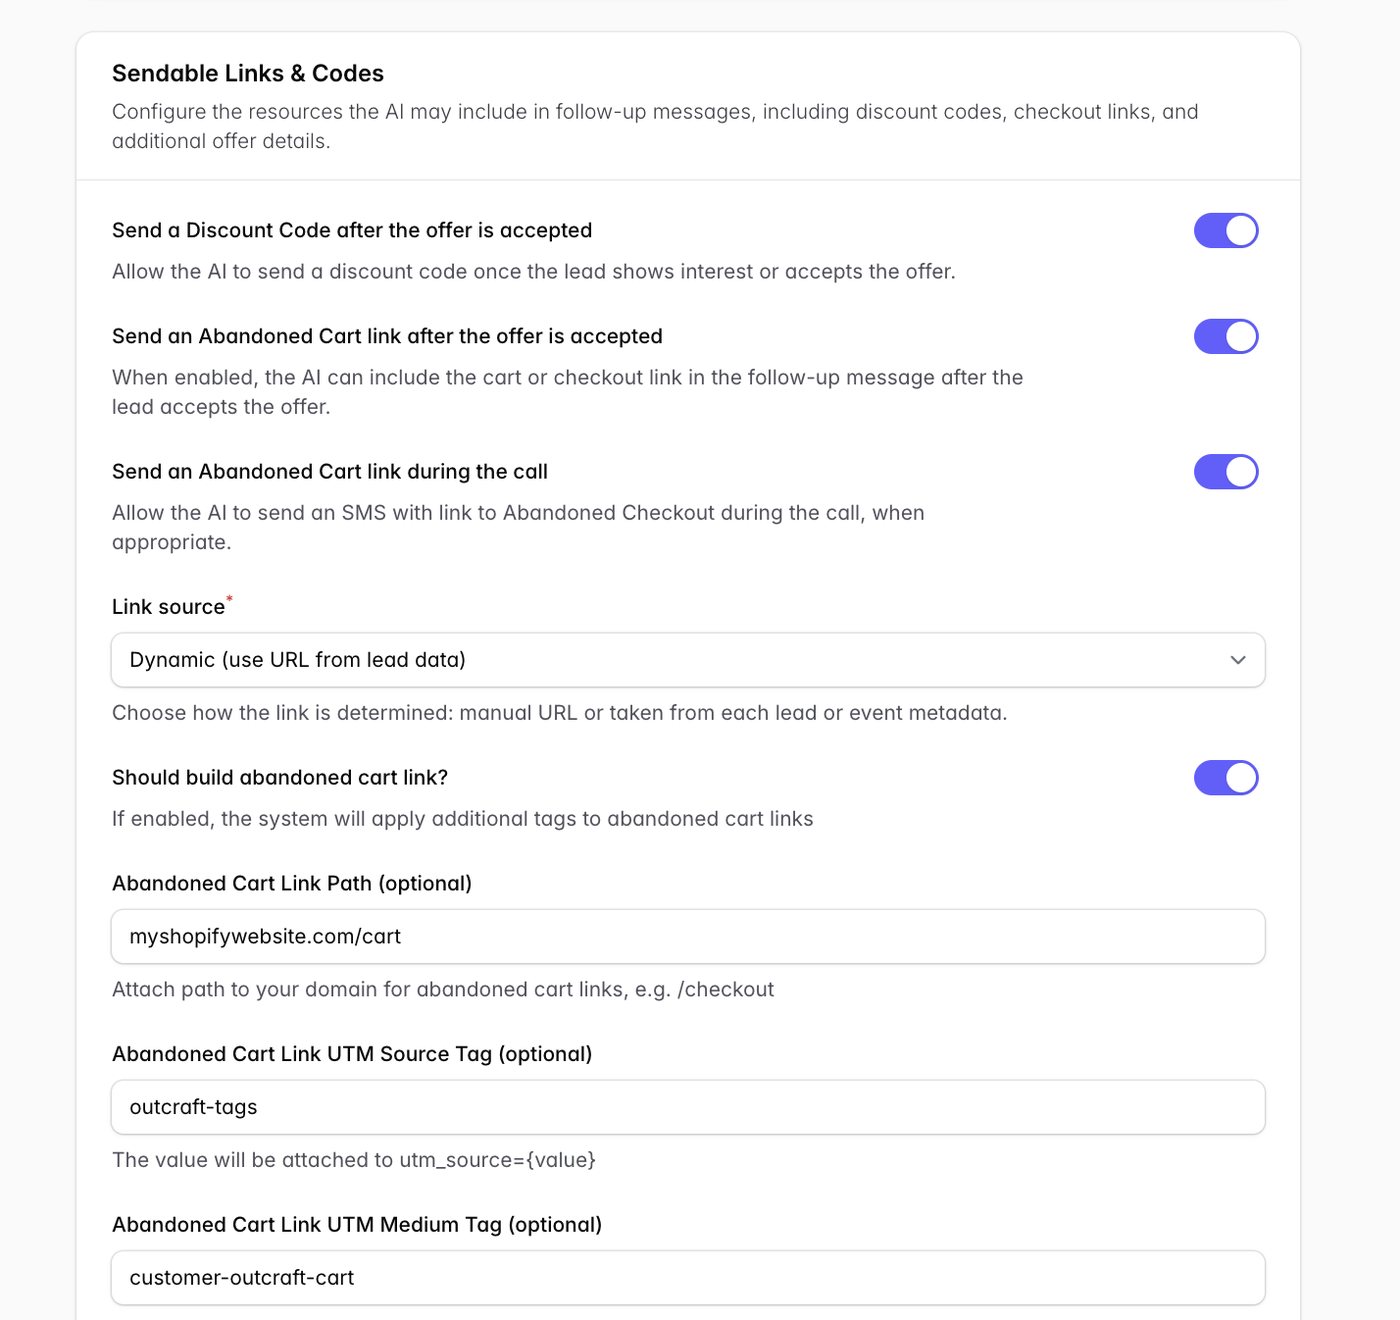
Sendable links & codes
Control what the AI may include in messages: discount codes, abandoned-cart links (during the call and/or after the offer is accepted), link source (manual vs dynamic from lead data), UTM tags, link shortening, and any extra info to send once the offer is accepted.
Static vs. dynamic links. Use a static link if you sell a single product (the same link suits everyone). Use a dynamic link for multi-product stores so that it returns each lead to their exact cart, including anything they had already filled in.
Link shortening applies to SMS, so texts stay short and tappable instead of carrying a long cart URL.
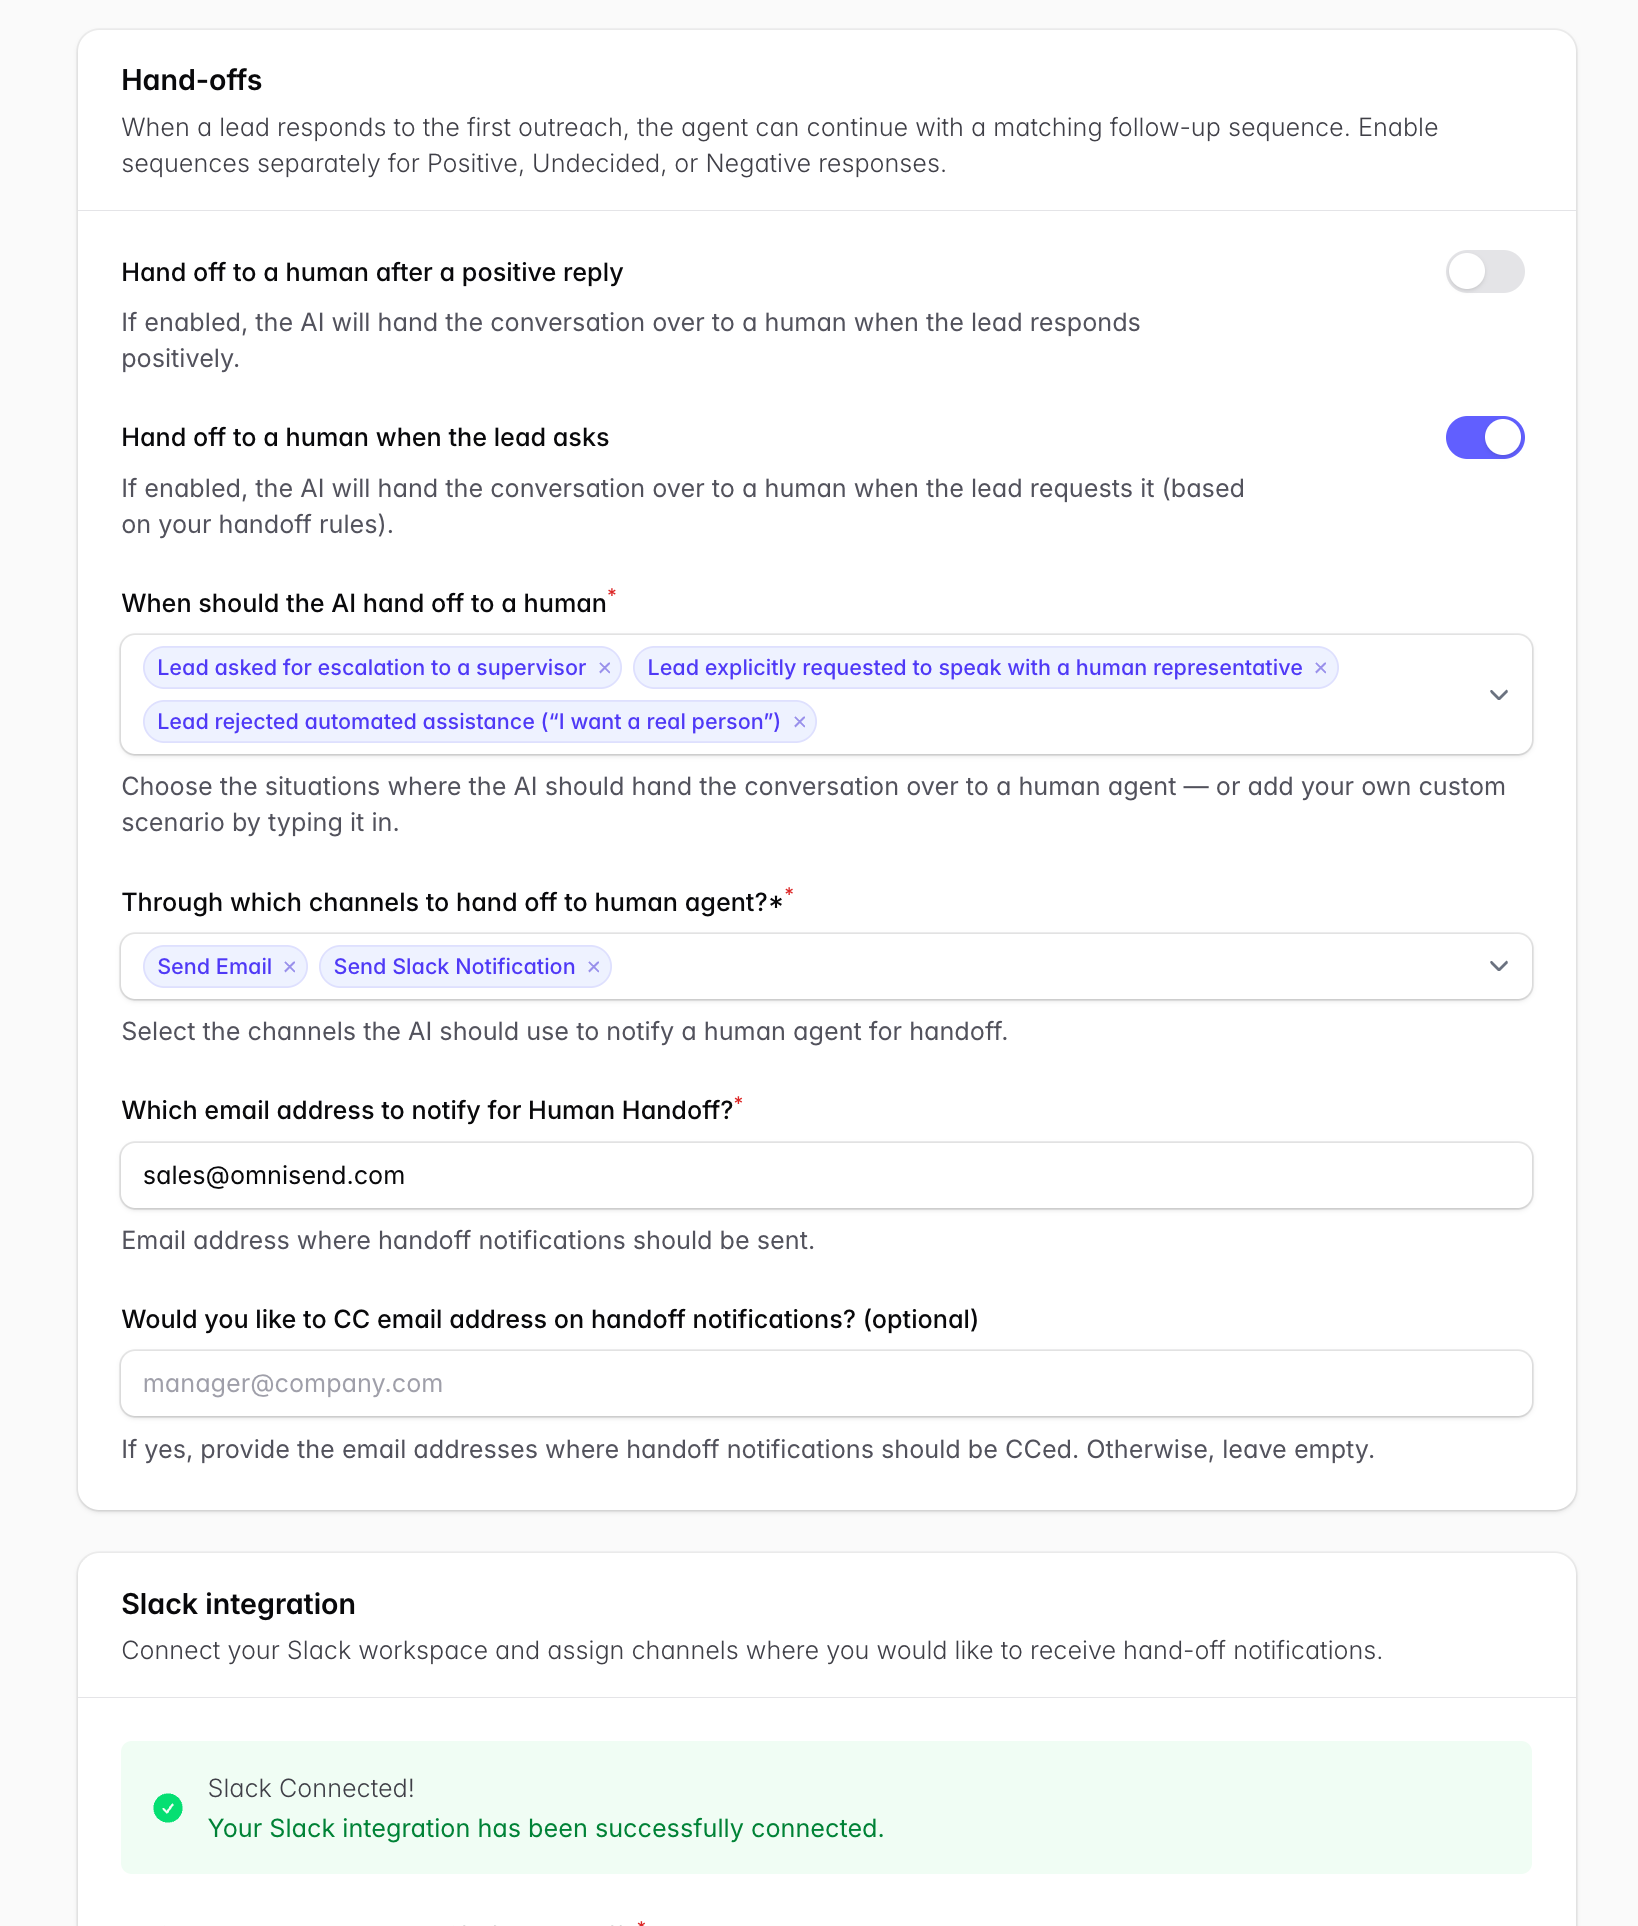
Hand-offs
Decide when the AI hands a conversation to a human. For example: After a positive reply, when the lead asks. Decide from the list of available objections or situations.
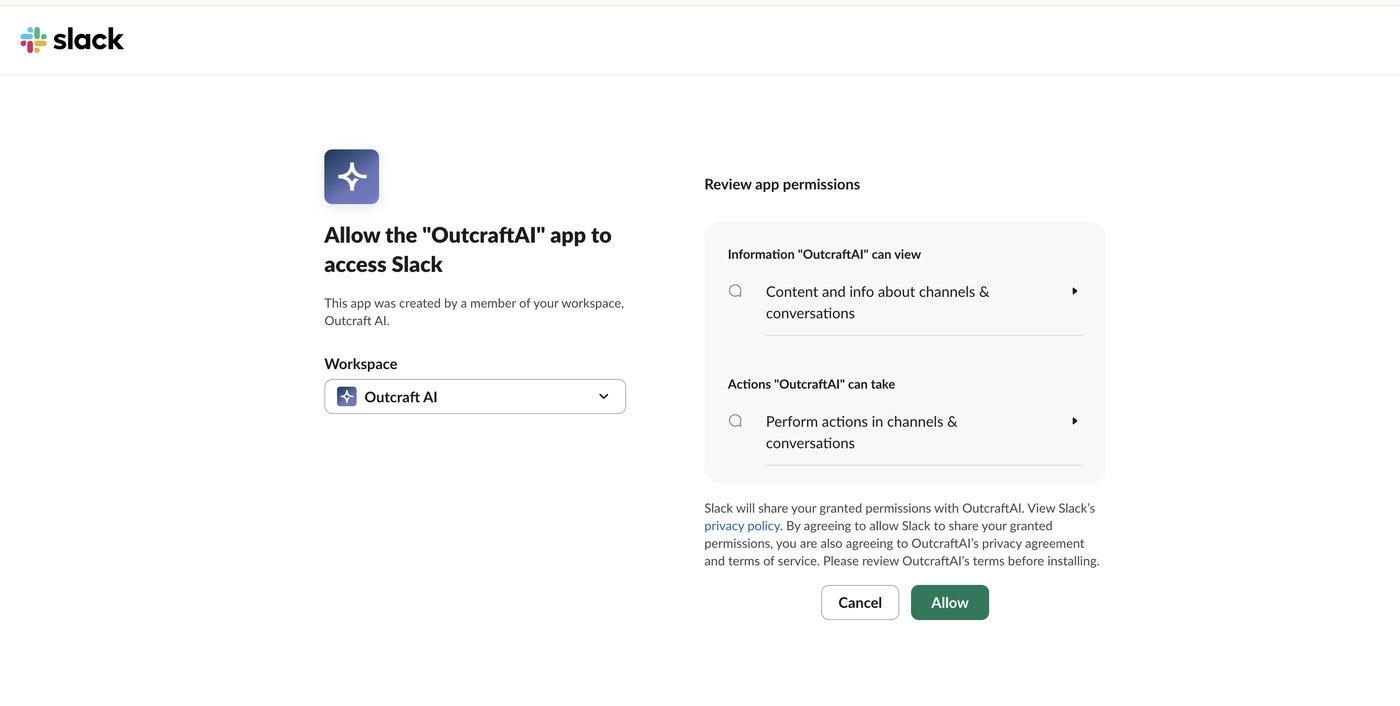
Then, decide which channels (email and/or Slack) where the hand-off will be sent. Set the notification email and optional CC. To use Slack, click Connect Slack Account, choose the workspace, and approve the permissions.
2.3 Discount Codes (only for ecommerce-related campaigns)
Register the codes this campaign may use (e.g. FINISH10). The code referenced in your prompt should match one here.
Tiered discounting. A common, effective setup is two codes: a standard offer (e.g. 10%) the agent leads with, and a higher code (e.g. 15%) reserved only for leads who keep hesitating on price. Register both here and describe in the prompt when to use each.
Keep codes short and simple — e.g. COMEBACK10 or FINISH15, not random letters and numbers. The agent has to say the code aloud and the customer has to remember it.
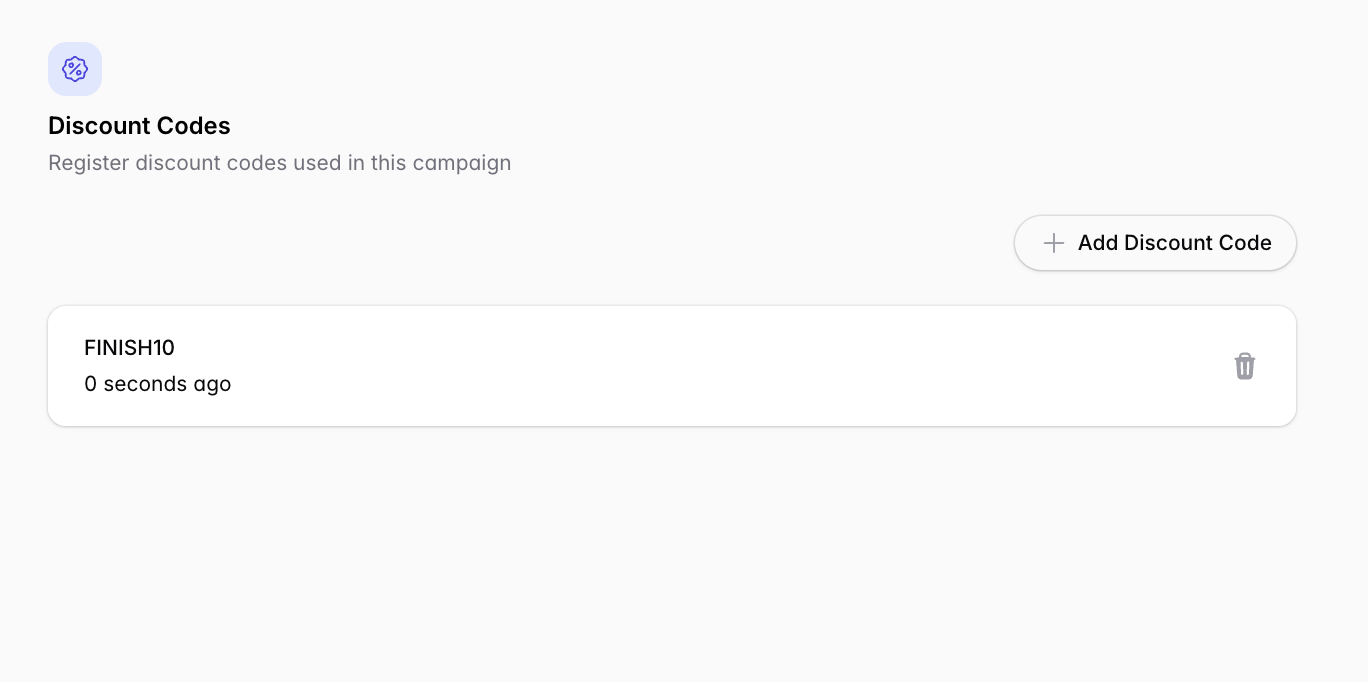
⚠ Watch out
Use a Discount Code unique to Outcraft AI. Otherwise, it will be difficult to determine when sales were assisted through the tool.
2.4 Schedule
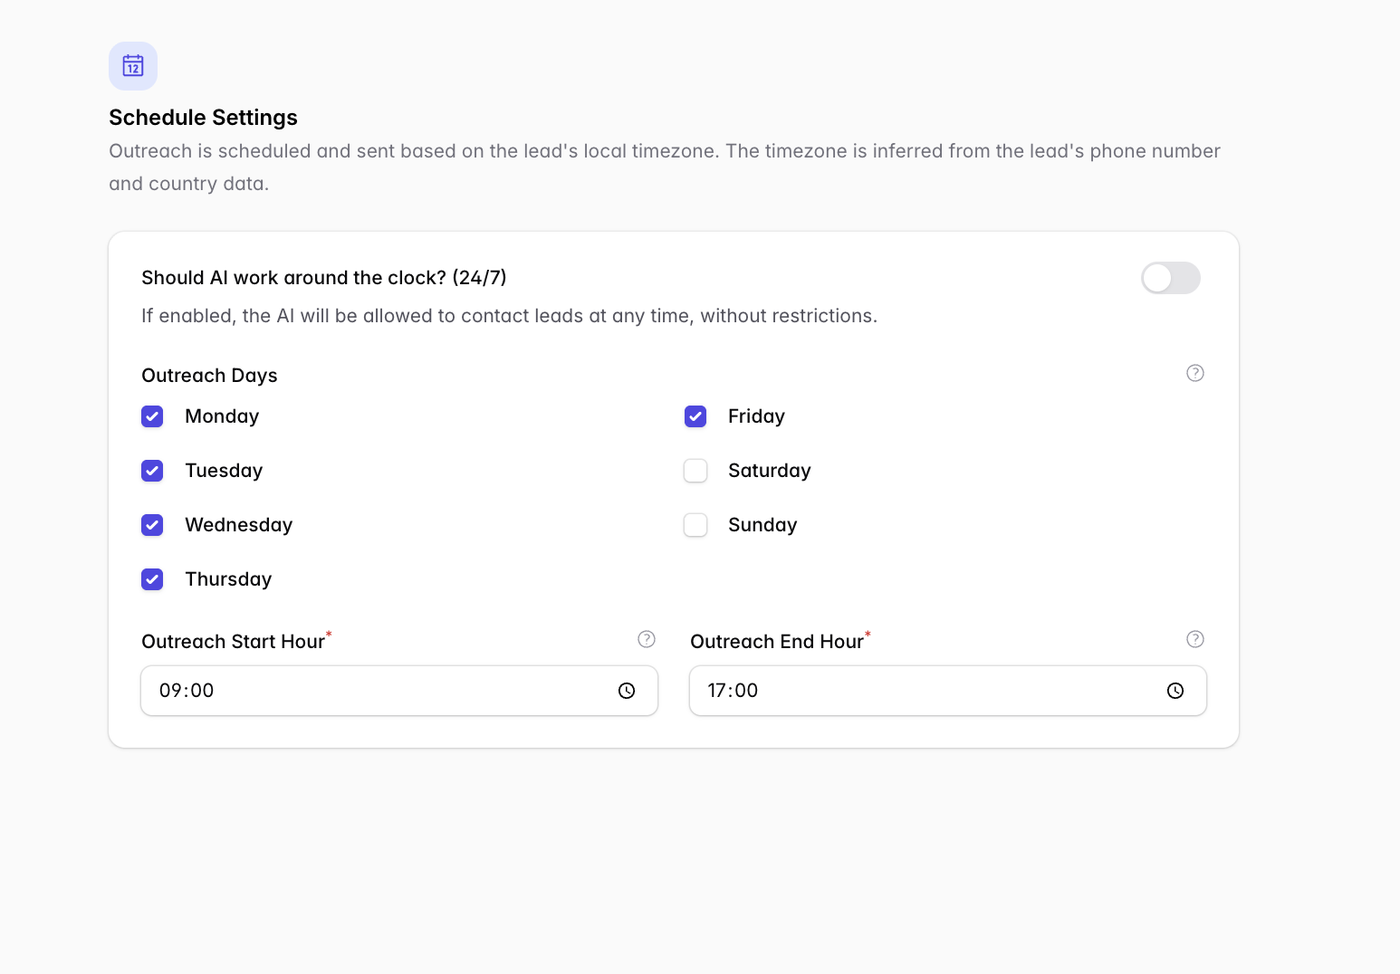
Outreach is sent in the lead's local timezone (inferred from their phone/country). Choose 24/7 if your campaign doesn’t use phone calls so emails can be sent at all times of the day. Or, set outreach days and a start/end hour. A 9:00–17:00, Mon–Fri window is a safe default.
2.5 Outreach Channels
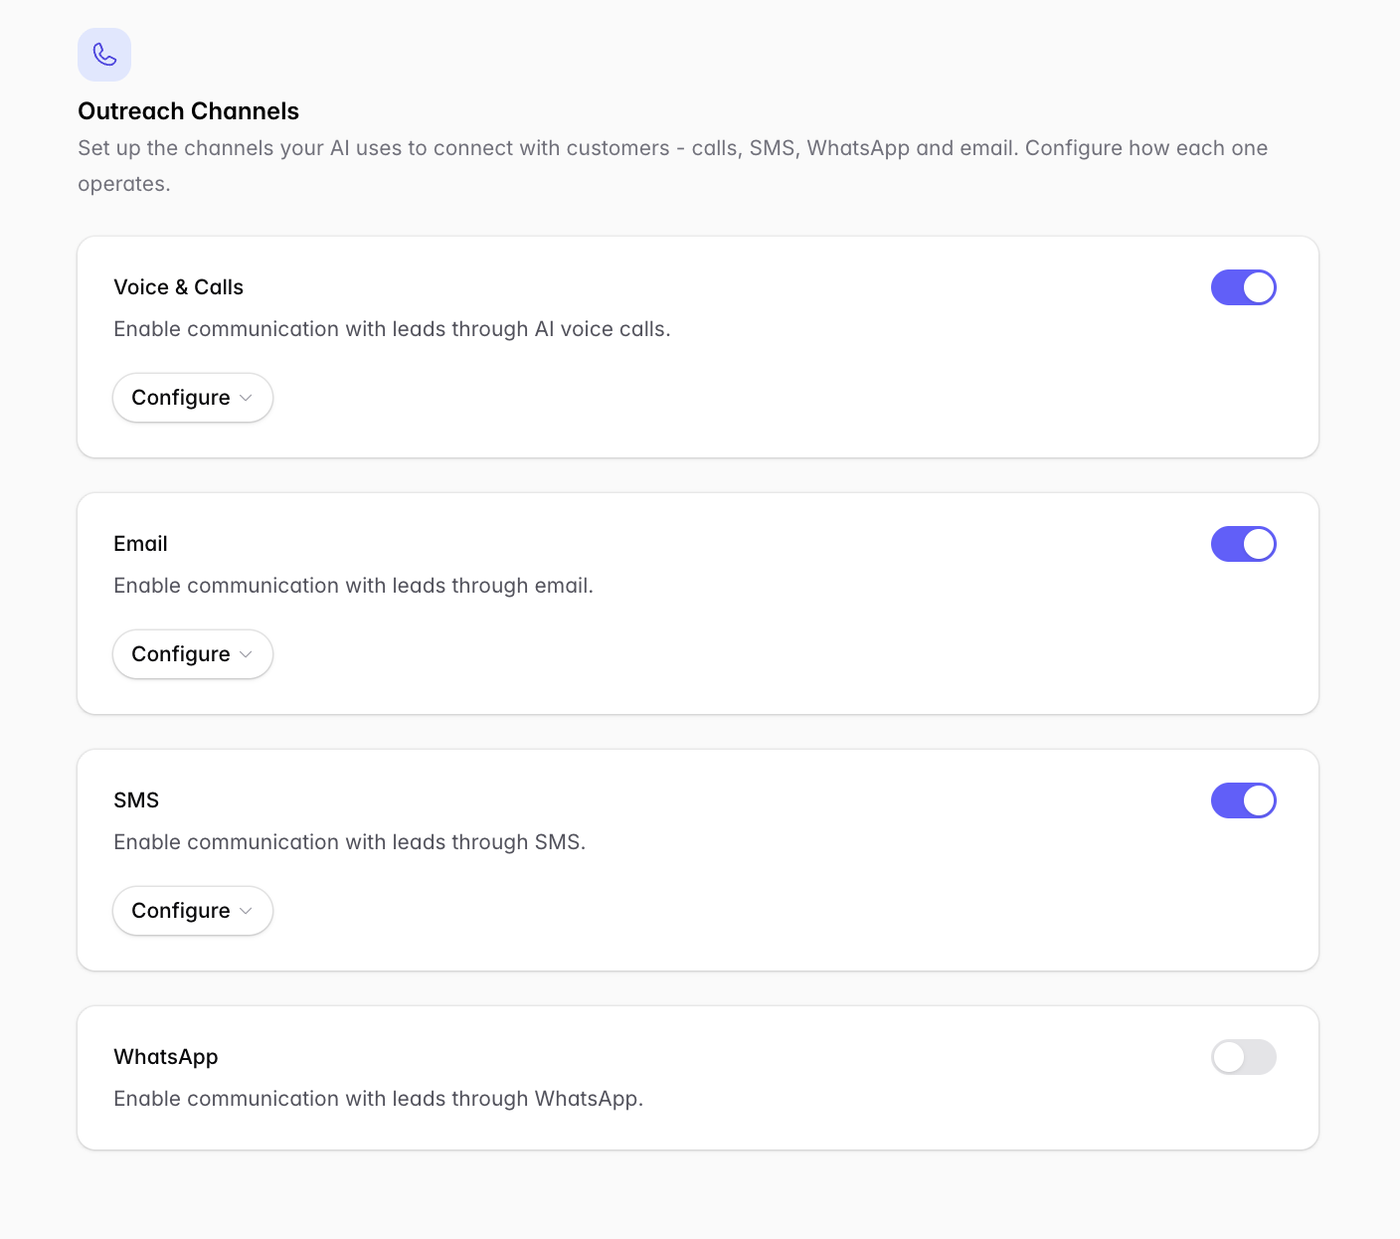
Enable and configure the channels the agent uses: Voice & Calls, Email, SMS, WhatsApp. Each has its own Configure panel.
In order to enable WhatsApp you must have a Meta for Business account connected to WhatsApp Business account.
US SMS requires A2P registration. Before SMS will deliver reliably to US numbers, the campaign's sender must be registered for A2P. Outcraft helps submit this, and approval can take time, so start early. EU destinations are exempt from A2P.
2.6 Outreach Sequence
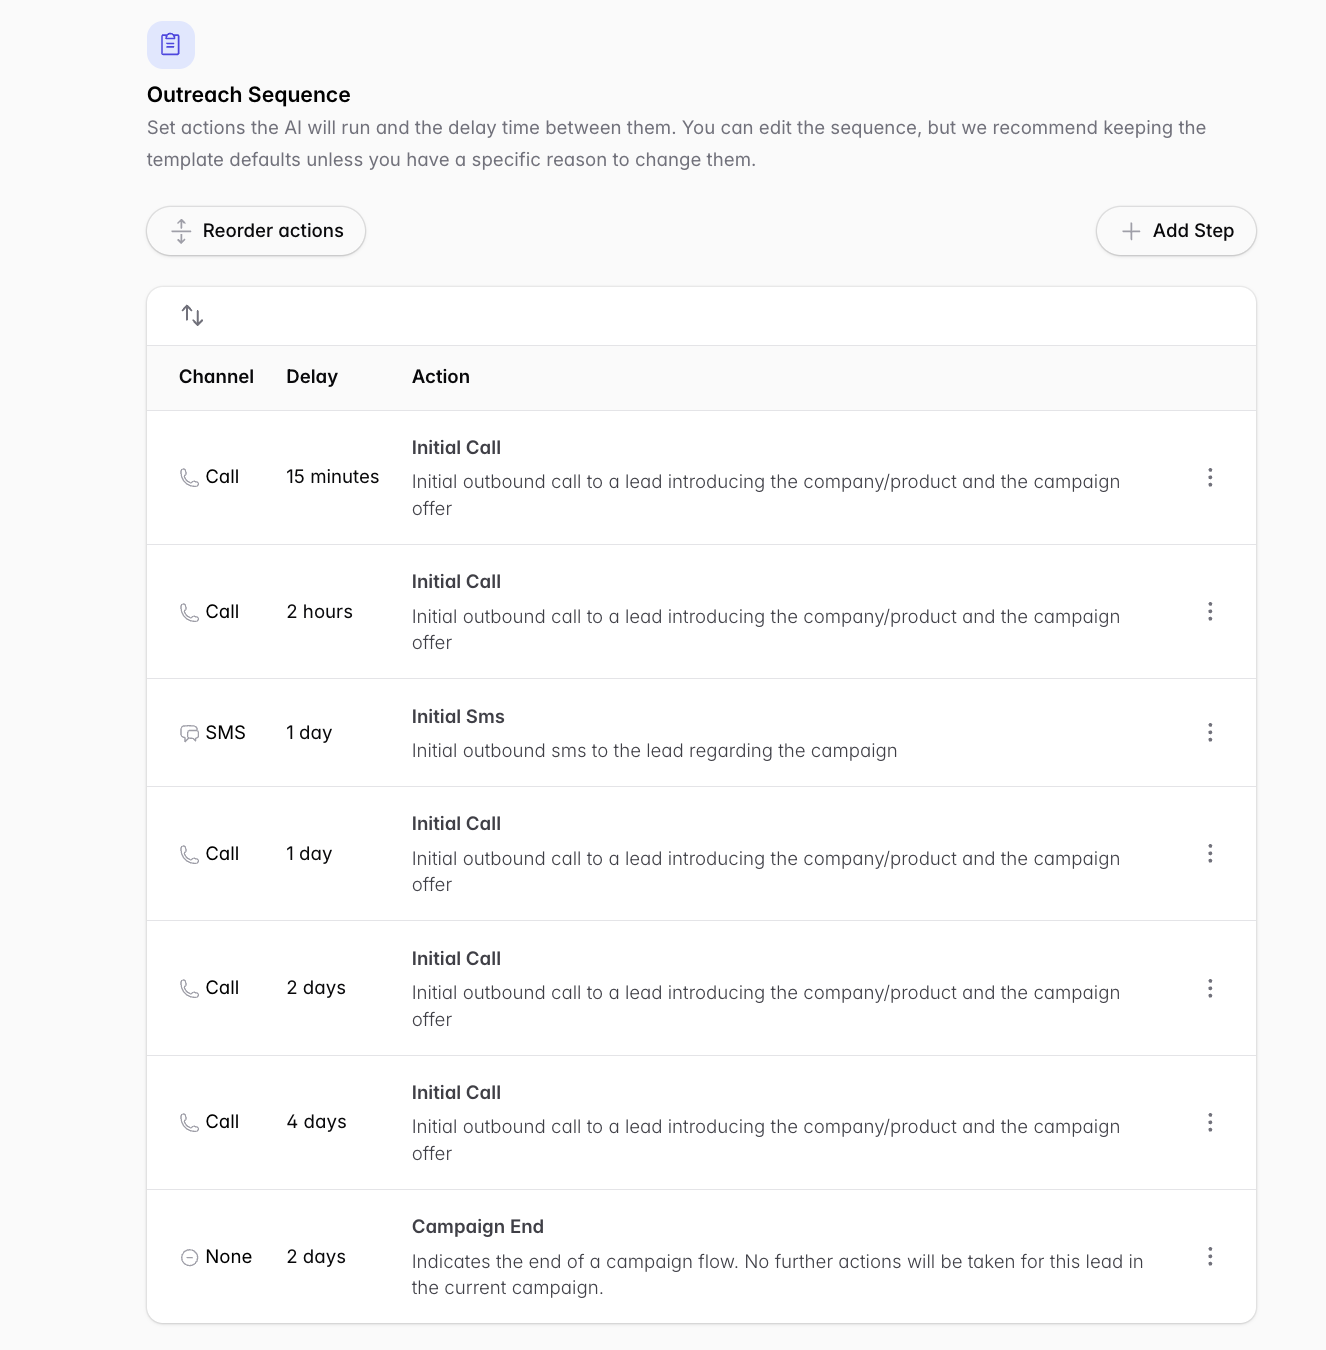
This is the motion that will be used to contact leads. Once a lead goal is reached (Meeting booked, sale completed, etc) the sequence will stop. If you have follow-ups configured, and a follow-up condition is met, the Outreach Sequence will follow that instead. Each step occurs cumulatively to the previous. For example, a call 2 hours after a 15 minute Initial Call is 2 hours, 15 minutes after lead is triggered.
You may re-arrange this sequence to your desired sequence and include as many methods of outreach as needed.
Default sequence. Out of the box: call 15 minutes after the trigger → if no answer, call again ~2 hours later → an SMS the next day, followed ~3 minutes later by a call (so the lead knows who's reaching out) → then calls on day 1, day 2, and so on. If the lead answers, the sequence stops.
To modify a pre-filled outreach click the three vertical dots on the right-hand side of the column and click “Edit”
2.7 Follow-Ups
Separate sequences for Positive, No-decision, and Negative replies. Pick which to edit from the dropdown. Each is a list of Ping Call / Ping Email / Ping SMS steps with their own delays, referencing the prior conversation to re-engage.
Click the dropdown to change the Follow-up Sequence for each purpose. You may use all three Follow-Up Sequences at a given time.
2.8 Interaction Evaluations
Define what the agent should detect or extract from each conversation. Create evaluations with a response format — Yes/No, Text Summary, Classified, or Number — plus instructions (e.g. “Return YES if the lead recognized they were talking to an AI agent”). These power your insights and analytics.
Popular use cases include:
Did the lead speak English?
Did the lead realize they were talking to an AI? (Yes/No)
What was the main objection? (Classified: price / timing / safety / other)
Did they hit checkout friction? (Yes/No)
Did they mention a competitor, and which? (Text)
Interaction summary (Text Summary)
Recommended setup: always include a free-text summary plus several Yes/No, Classified, and Number fields — the structured fields let the analytics roll answers into counts and percentages. One client discovered 20% of abandoners were blocked by checkout friction rather than hesitation.
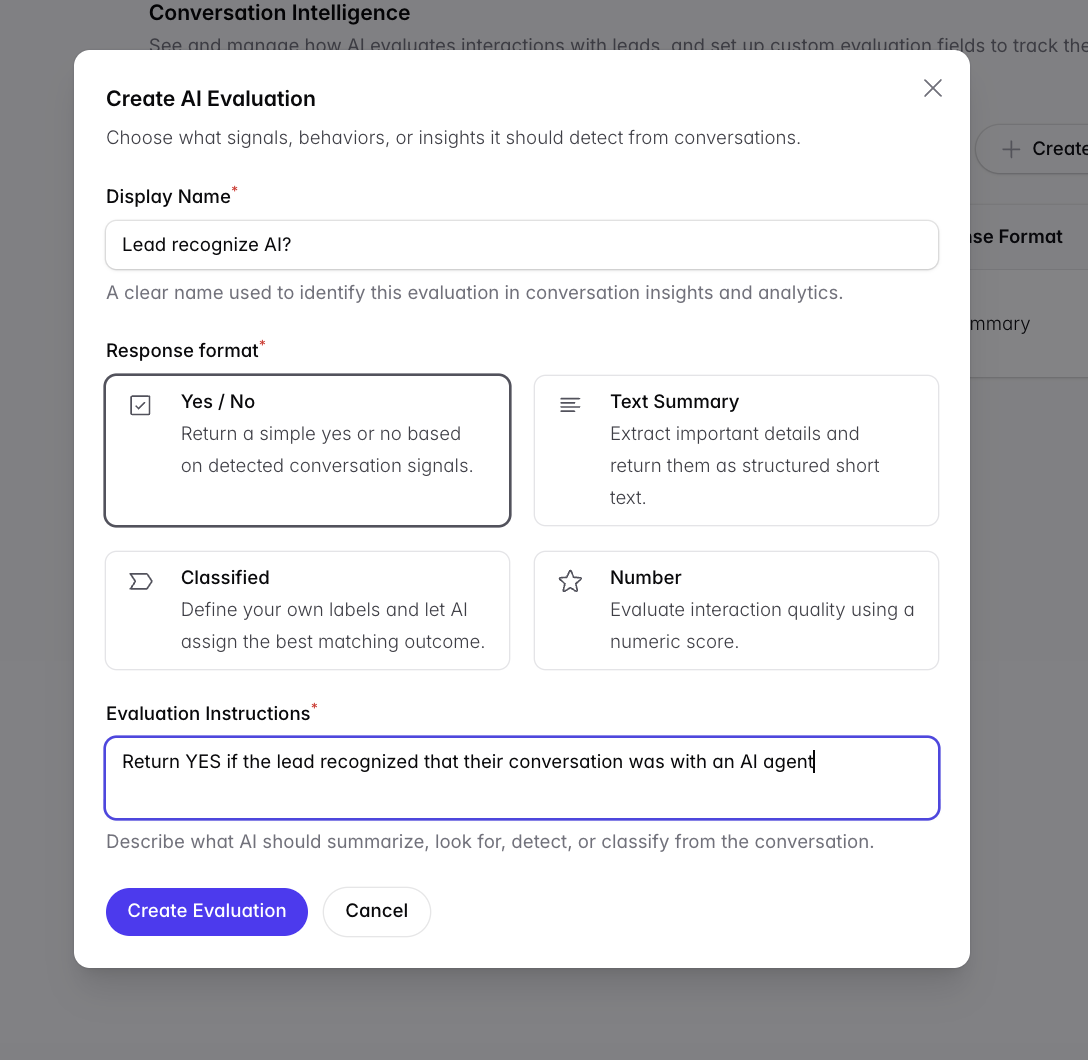
⚠ Watch out Interaction Evaluations are not retroactive. Summaries and evaluations will be collected from the date and time you create them. |
3. AI Agent
How the agent sounds and the infrastructure it runs on including language, sign-off and email signature.
3.1 Configuration
Agent name, language, voice (with a preview player), call background sound, and email signature. Add languages with per-language settings and a Default. The Advanced settings are tuned for fine-tuning the personality, greeting phrase and whether the agent may reveal itself to be AI and whether it must leave a custom voicemail message if a lead doesn’t pick up the phone.
AI disclosure is mandatory when asked. If a lead asks whether they're speaking to an AI, the agent will always confirm that it is. This is legally required and cannot be switched off. What is optional is whether the agent discloses it proactively up front (e.g. “this is a virtual assistant calling”); only that proactive opener is configurable.
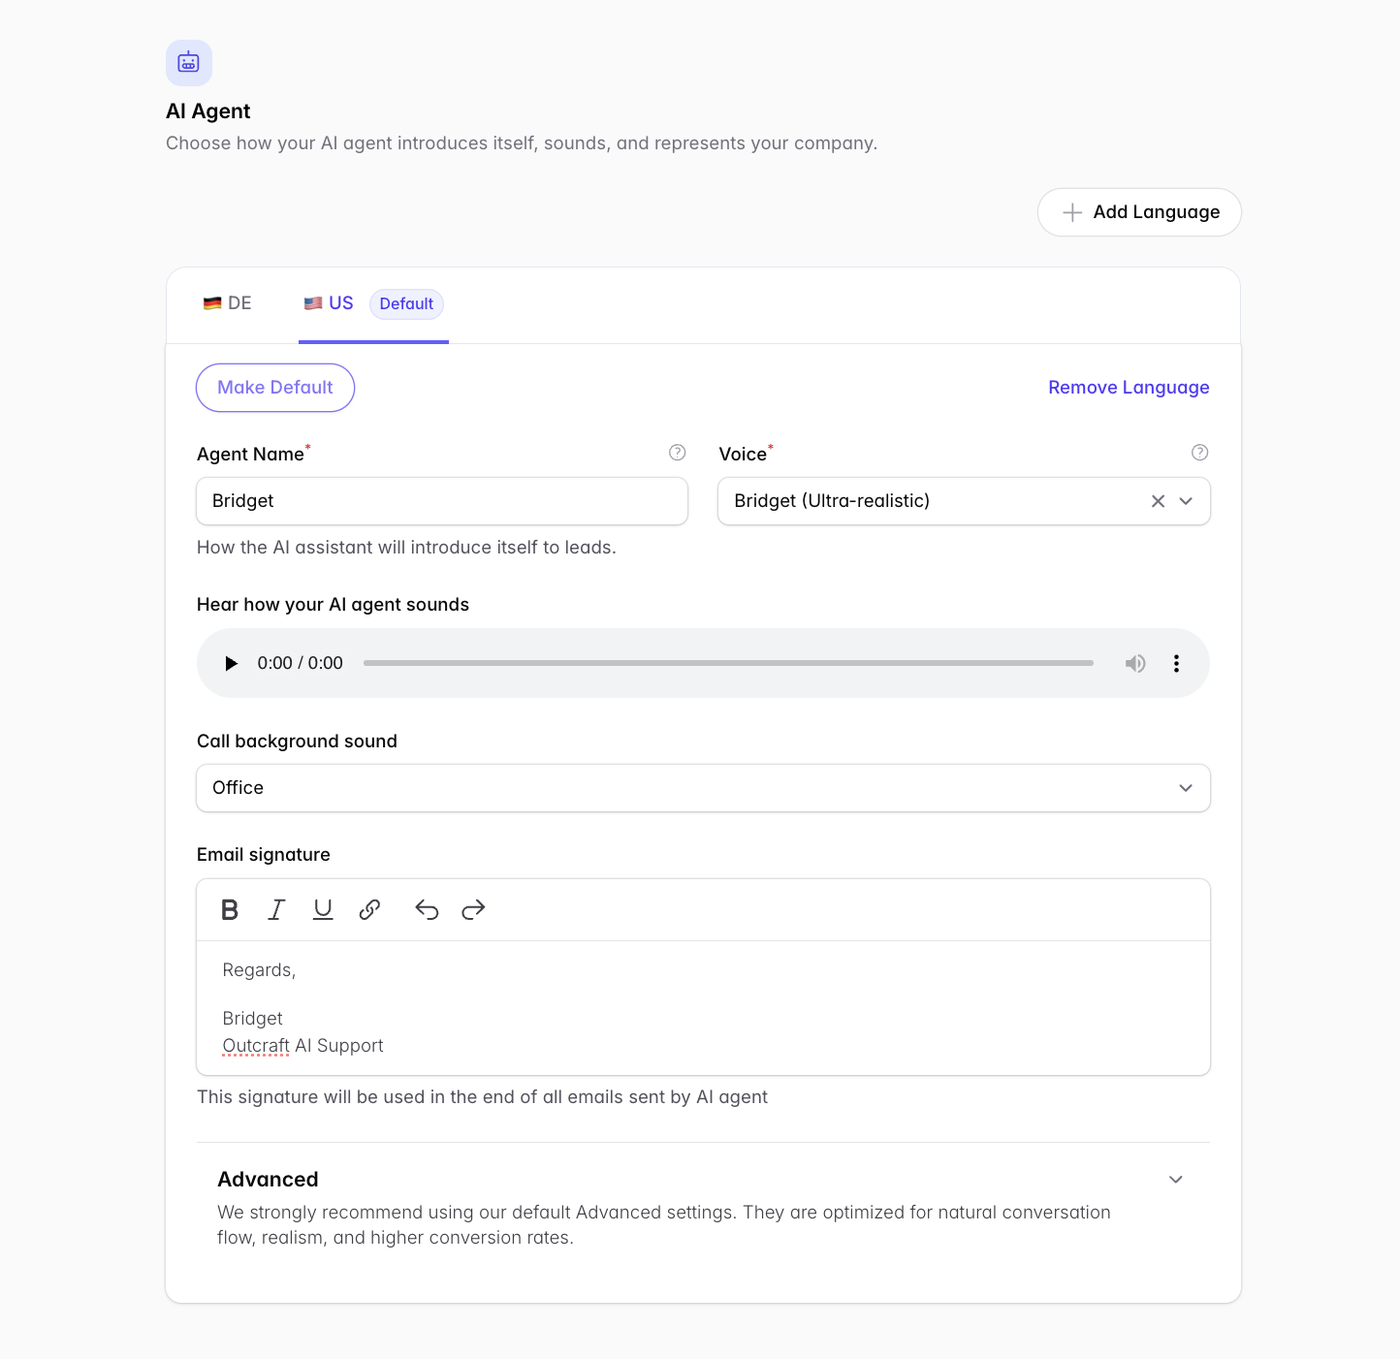
If only language is selected, it will be the default for all leads. However, if multiple languages are selected, the agent will speak the language associated with each country.
Available languages
US English (the most advanced language model)
UK English
German
Portuguese
Brazilian Portuguese
Italian
Spanish
Lithuanian
Note: The agent cannot currently change languages mid-conversation. It also cannot call in a second language in a country with an available primary language (Eg, if US English is default, and Spanish is configured, the agent cannot call an identified Spanish-speaker in the United States).
If you configure all languages, the agent will speak the language most commonly used with each country.
For email campaigns, you can configure a custom email signature to sign off each email.
Booking (if this campaign books meetings)
For booking-objective campaigns you'll also connect a calendar here. Calendly and HubSpot calendar integrations are available for us. Wait for the green Calendar Connected state, paste your Booking Link for Calls, and click Check Booking Link.
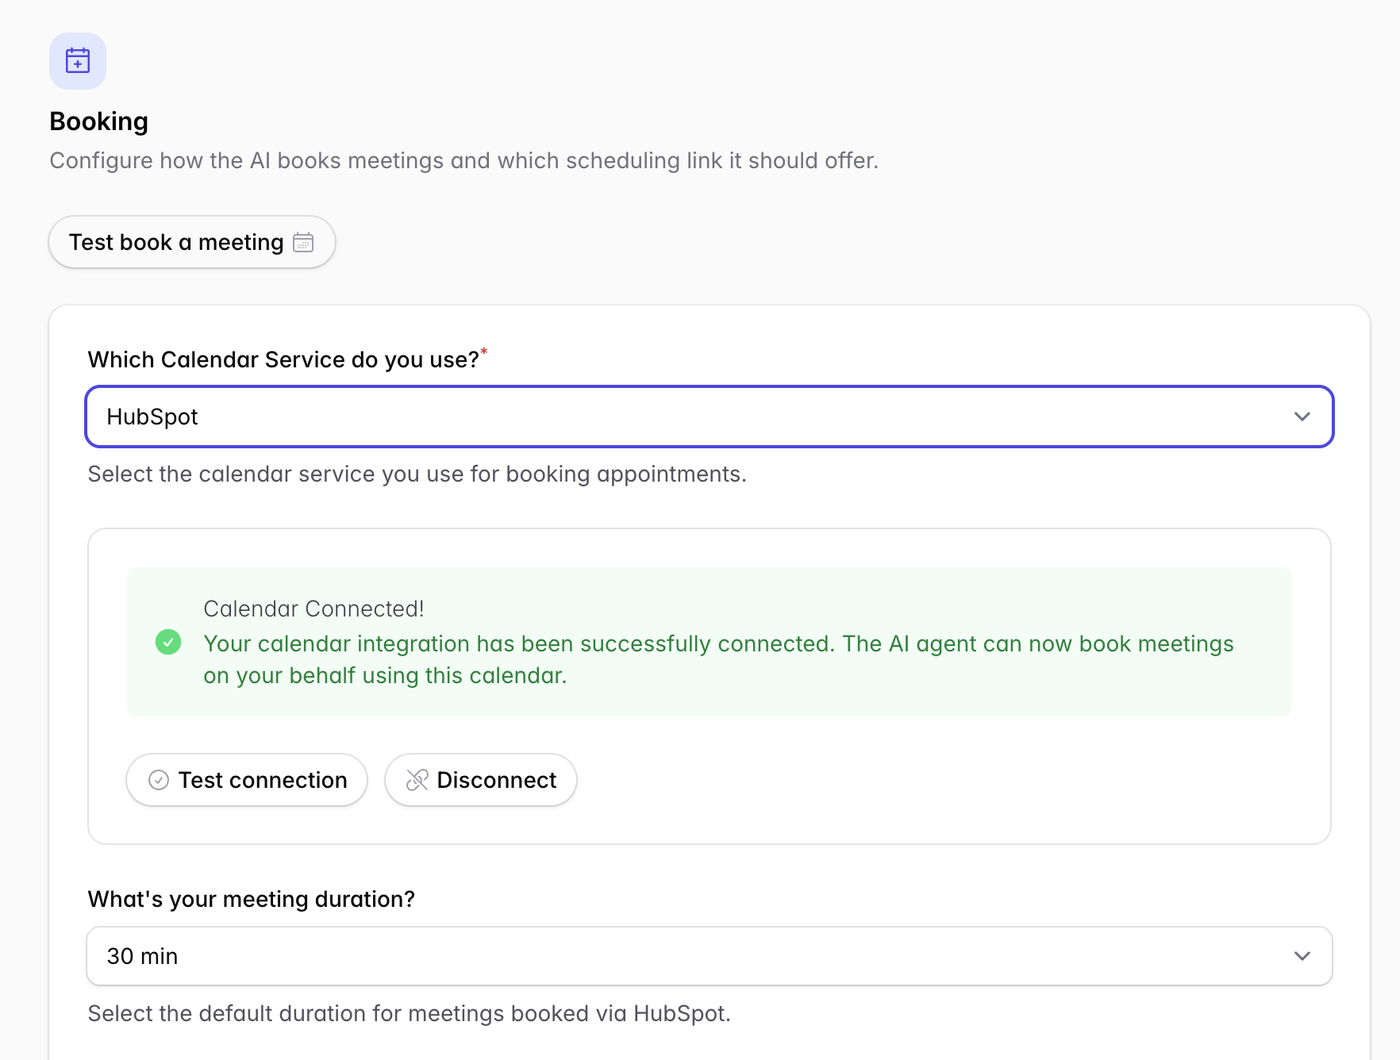
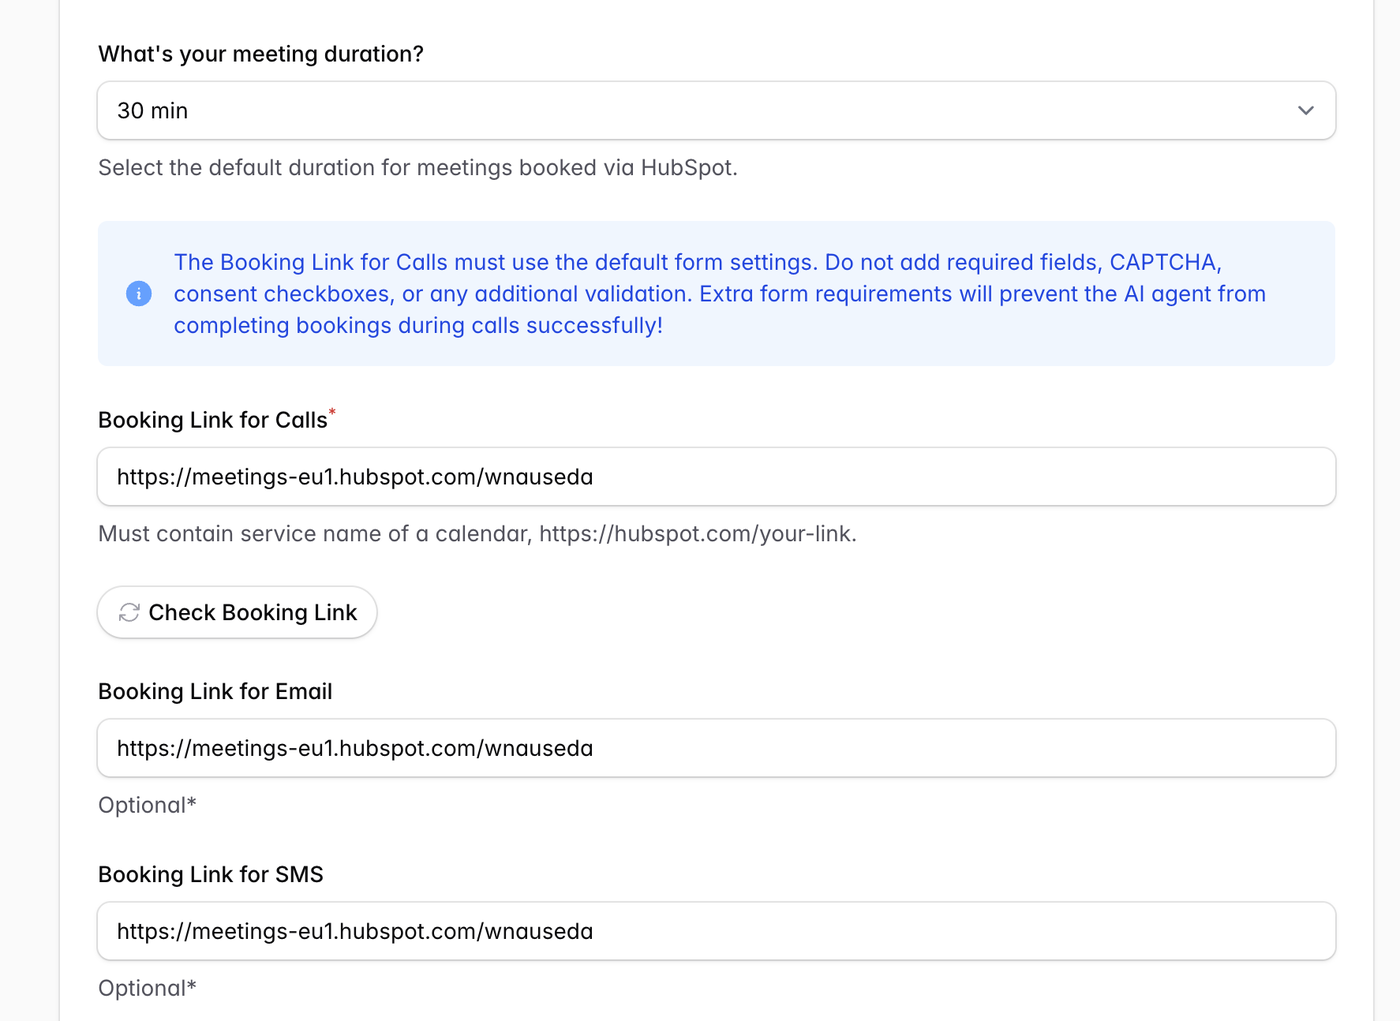
⚠ Watch out The booking link for calls must use the default form — no required fields, CAPTCHA, or consent checkboxes. Any extra form requirement makes the agent's booking fail mid-call, silently. Verify it now with Test book a meeting. |
3.2 Phone Numbers
The numbers your AI agent calls and texts from. Coverage in the lead's region improves answer rates and deliverability.
Click Physical Addresses to add your businesses’ address. This will allow calls from locations that require this information.
Click Add Phone Number.
Choose provider Twilio, pick the country (and state for the US), then Submit.
Repeat so you have coverage in each region you'll contact.
Automatic state matching (US). Outcraft can now place calls from a number that matches each lead's own state with phone number auto-scaling. For example, a New York lead is called from a New York number, a Georgia lead from a Georgia number. You only need to add one number to start testing.
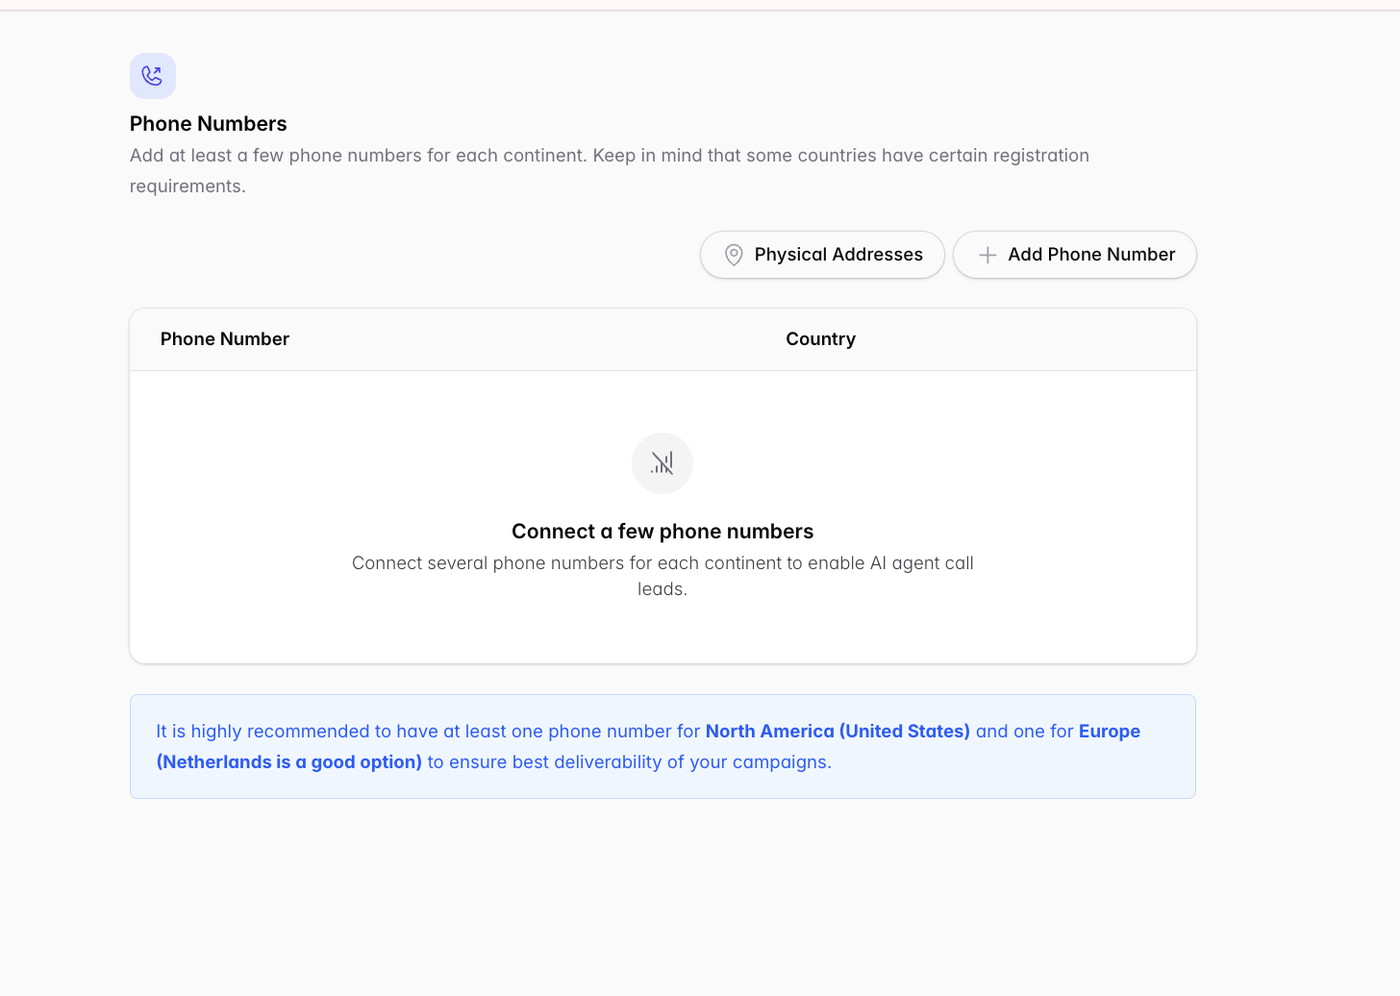
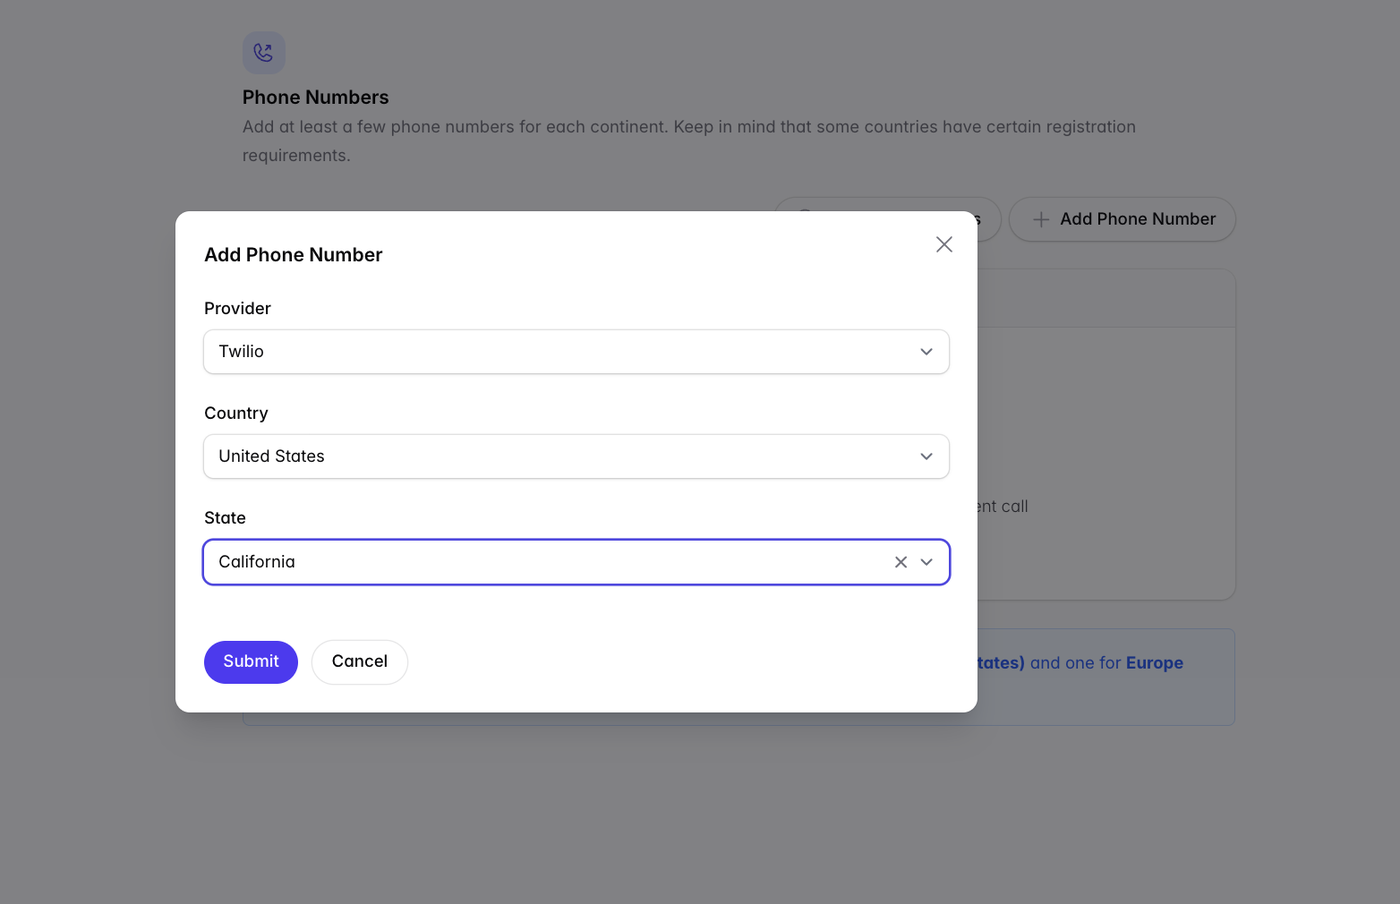
⚠ Watch out Add at least one US number and one EU number. Calling a lead from a local-looking number is a major factor on pickup rate. |
ℹ Note On local entity requirements. The Netherlands and the United States don't require a local entity to register a number — which is why they're the recommended defaults and cover EU + North America cleanly. If you'd rather call leads from a number local to their own country/region (often best for pickup), be aware that some countries require you to have a registered local entity there before you can provision a number. Check the requirements for that country before you rely on a local number. Please contact Outcraft Support if you have a business entity in your desired outbound phone number country. We will help you configure it. |
3.3 Email Accounts
The inbox the agent sends from, replies from, and threads conversations in. Available for Google Workspace, Microsoft 365/Outlook or standard IMAP/SMTP.
Google Workspace
Needs your Google Workspace administrator, not just the campaign owner. This is the most common place onboarding stalls — line up your admin first.
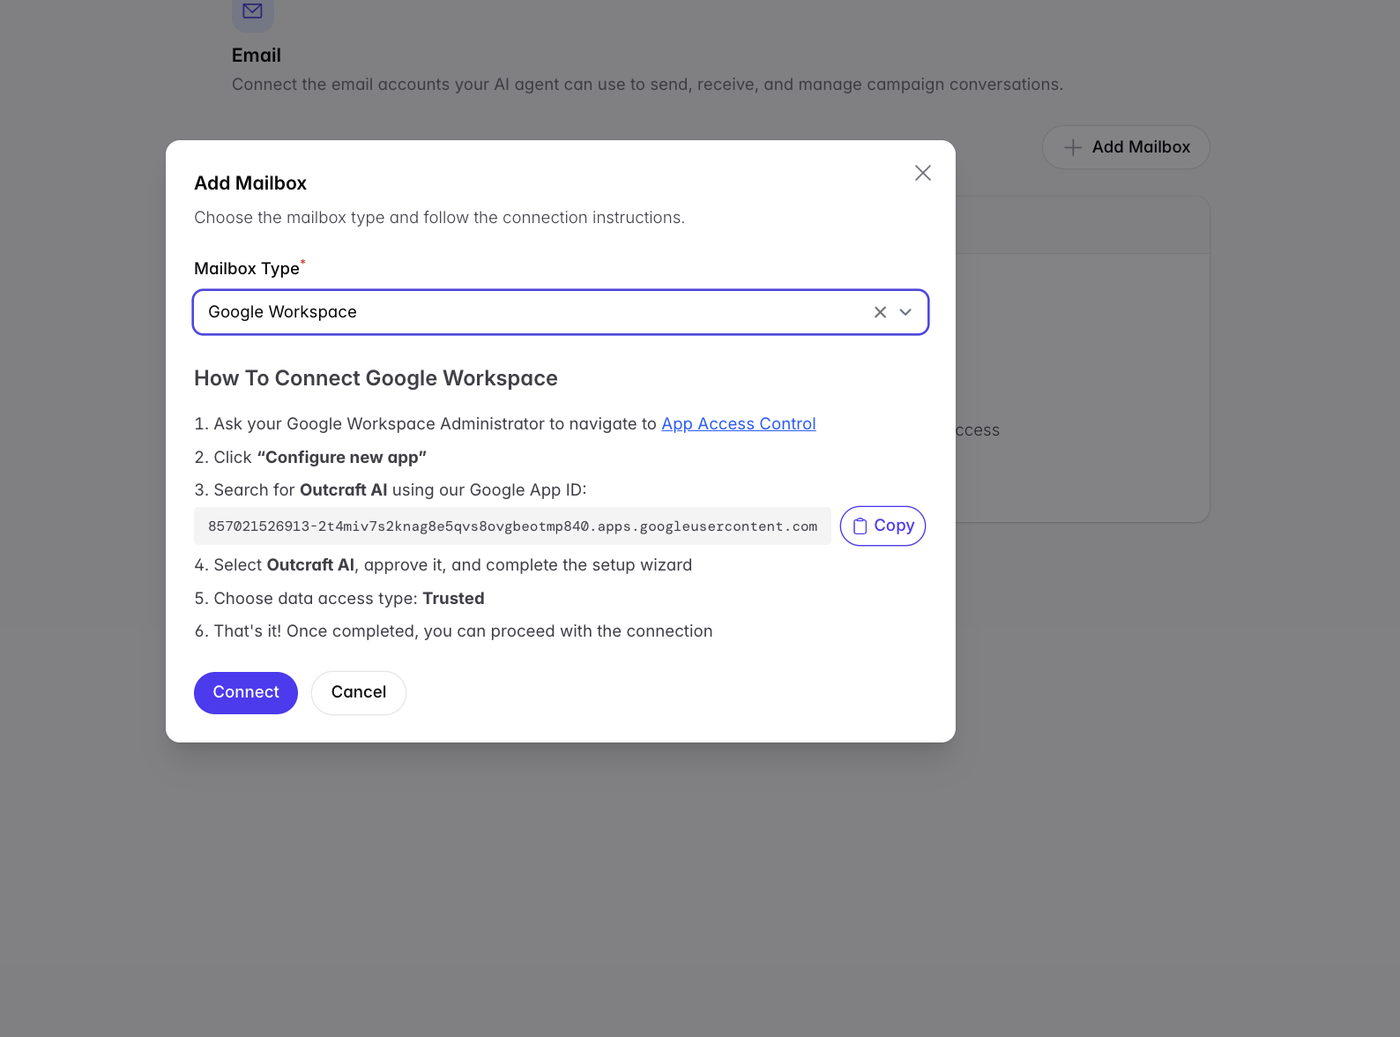
In Add Mailbox, set Mailbox Type to Google Workspace.
Your Workspace admin opens App Access Control in the Google Admin console and clicks Configure new app.
Search by the Google App ID shown in Outcraft (use the Copy button — don't retype it), select Outcraft AI, approve it.
Set data access type to Trusted, finish the wizard, then click Connect in Outcraft.
IMAP/SMTP
Enter the mailbox email and password, then expand Server Information. Use Autodetect Settings first — it fills IMAP/SMTP host and ports from your email address. Override only if autodetect can't authenticate. Tick Different SMTP credentials if your provider needs them.
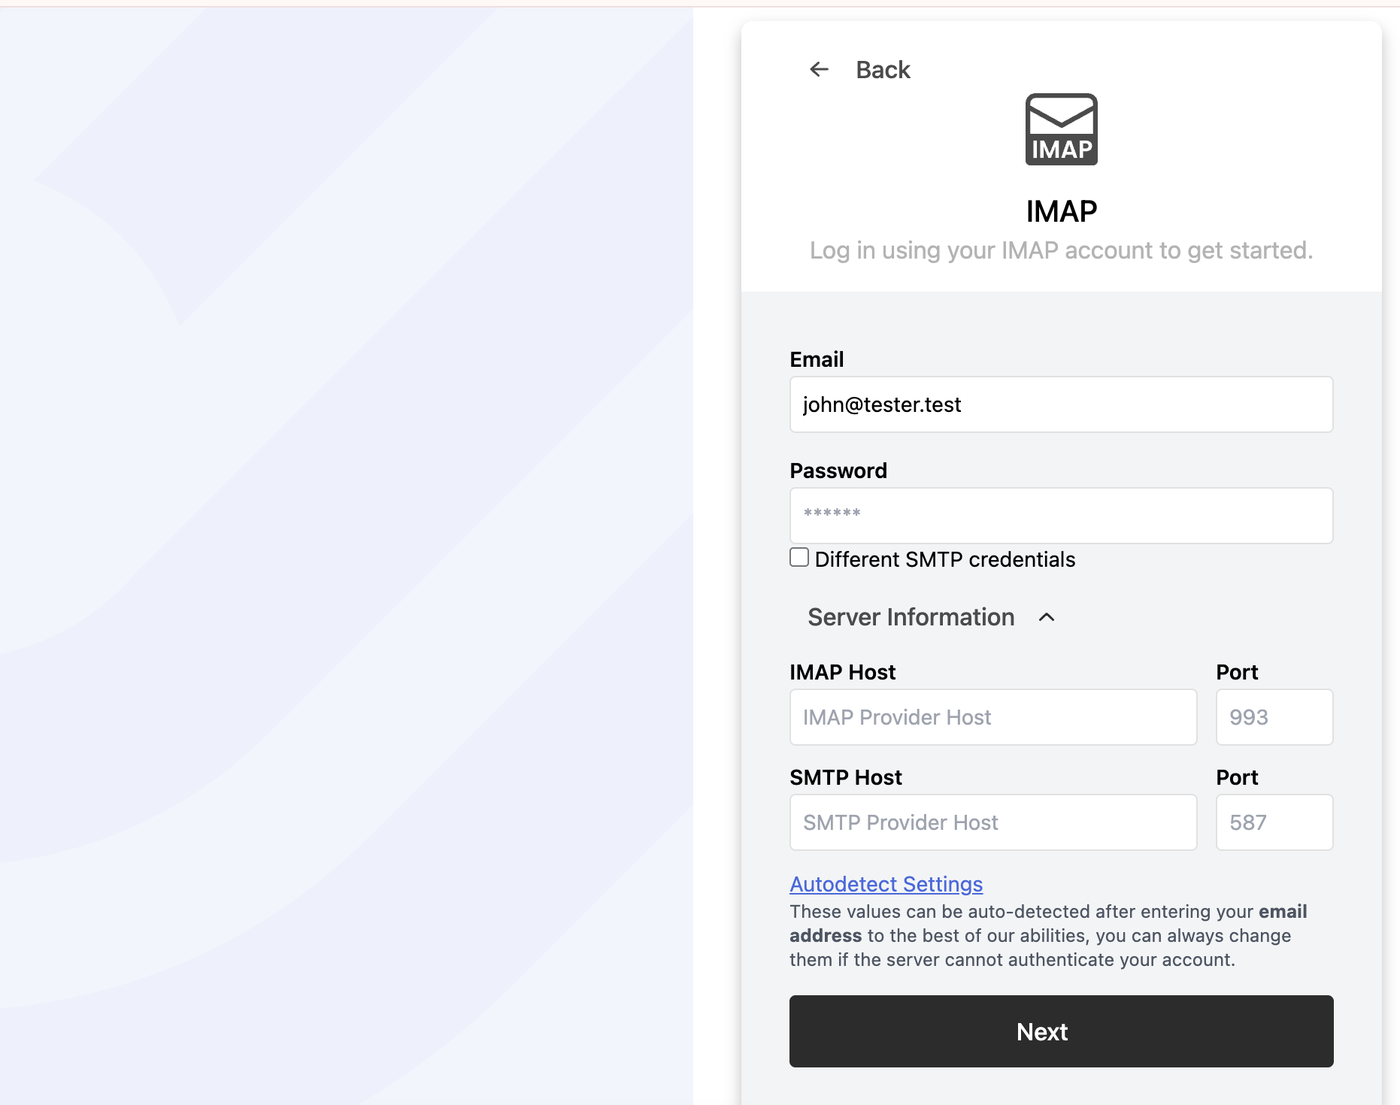
⚠ Watch out The Google route requires admin rights and the Trusted access level — “Limited” silently blocks sending. If you're not the admin, send them the steps above and the App ID; they need nothing else from Outcraft. |
4. Lead Source Configuration
4.1 Shopify
Once connected, open How to connect Shopify events and create the webhooks in your Shopify admin.
In Shopify: Settings → Notifications → Webhooks → Create webhook.
For each event Outcraft lists (Checkout Creation, Checkout Updated, Order Creation): set Format = JSON, paste the exact URL shown, and match the Webhook API version.
Back in Outcraft, flip the toggle on each event row in the table to activate it.
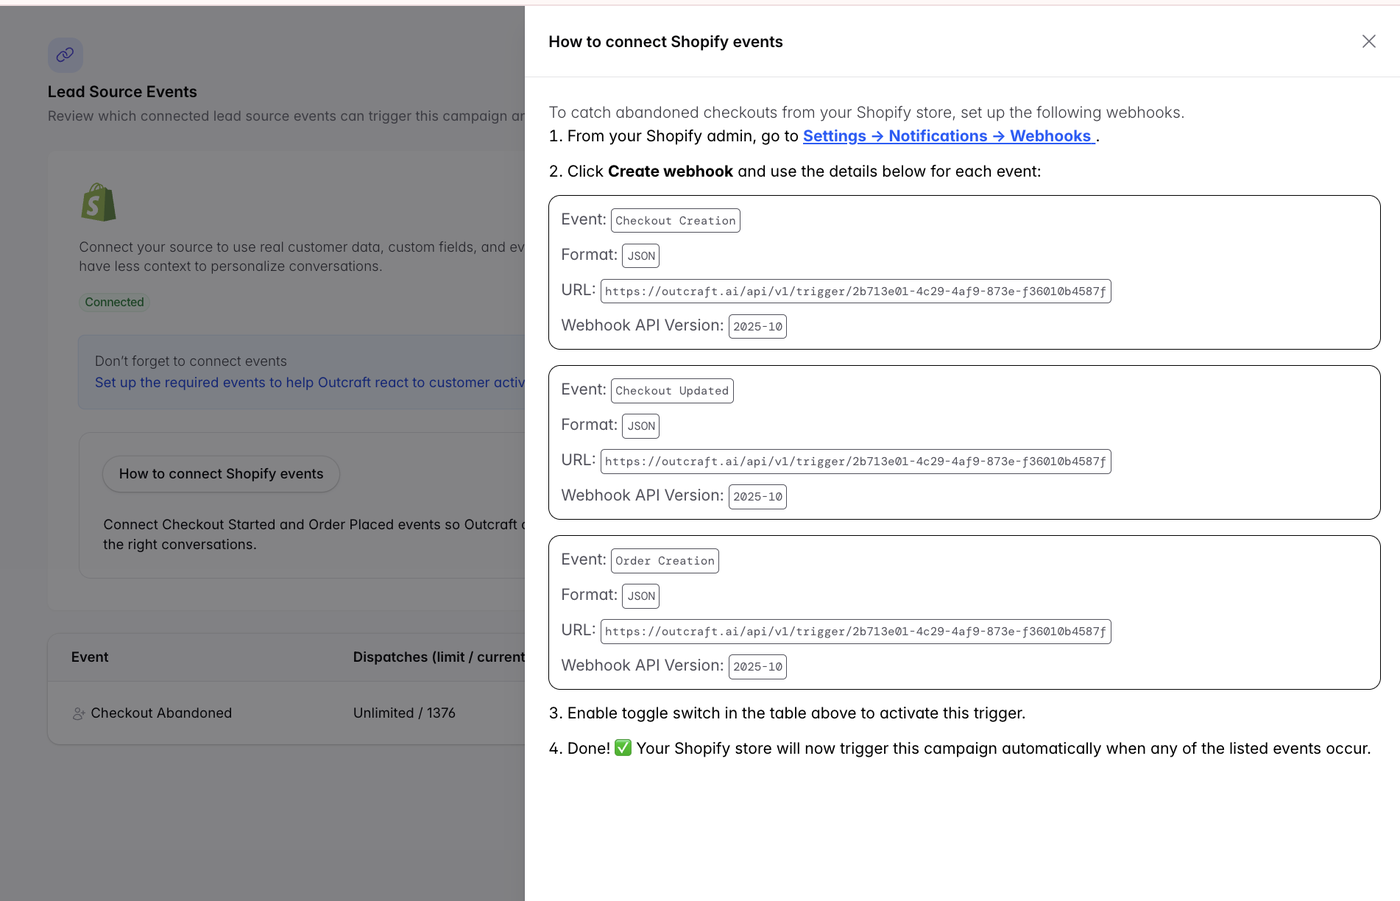
⚠ Watch out Two easy misses: (1) creating only some of the listed webhooks, and (2) forgetting step 3 — the event won't fire until the toggle in the Outcraft table is on, even if the webhook exists in Shopify. |
✓ How to verify The event row shows a live Dispatches counter (e.g. “Unlimited / 0”). After a test checkout, that number should tick up. If it stays at 0, the webhook or the toggle isn't right. |
Why the order event matters. Enabling the Order Creation (order-placed) event is what tells Outcraft a lead has converted, so it stops contacting them. Without it, the campaign may keep calling and texting people who have already purchased. The same applies to the order-placed trigger on other sources such as Klaviyo.
4.2 HubSpot
Connecting HubSpot creates a contact property called outcraft_active_campaign_id. Setting it on a contact starts the campaign; a specific stop value ends it.
To start manually: set outcraft_active_campaign_id to the campaign ID shown (copy it). The contact imports into Outcraft and the campaign starts automatically.
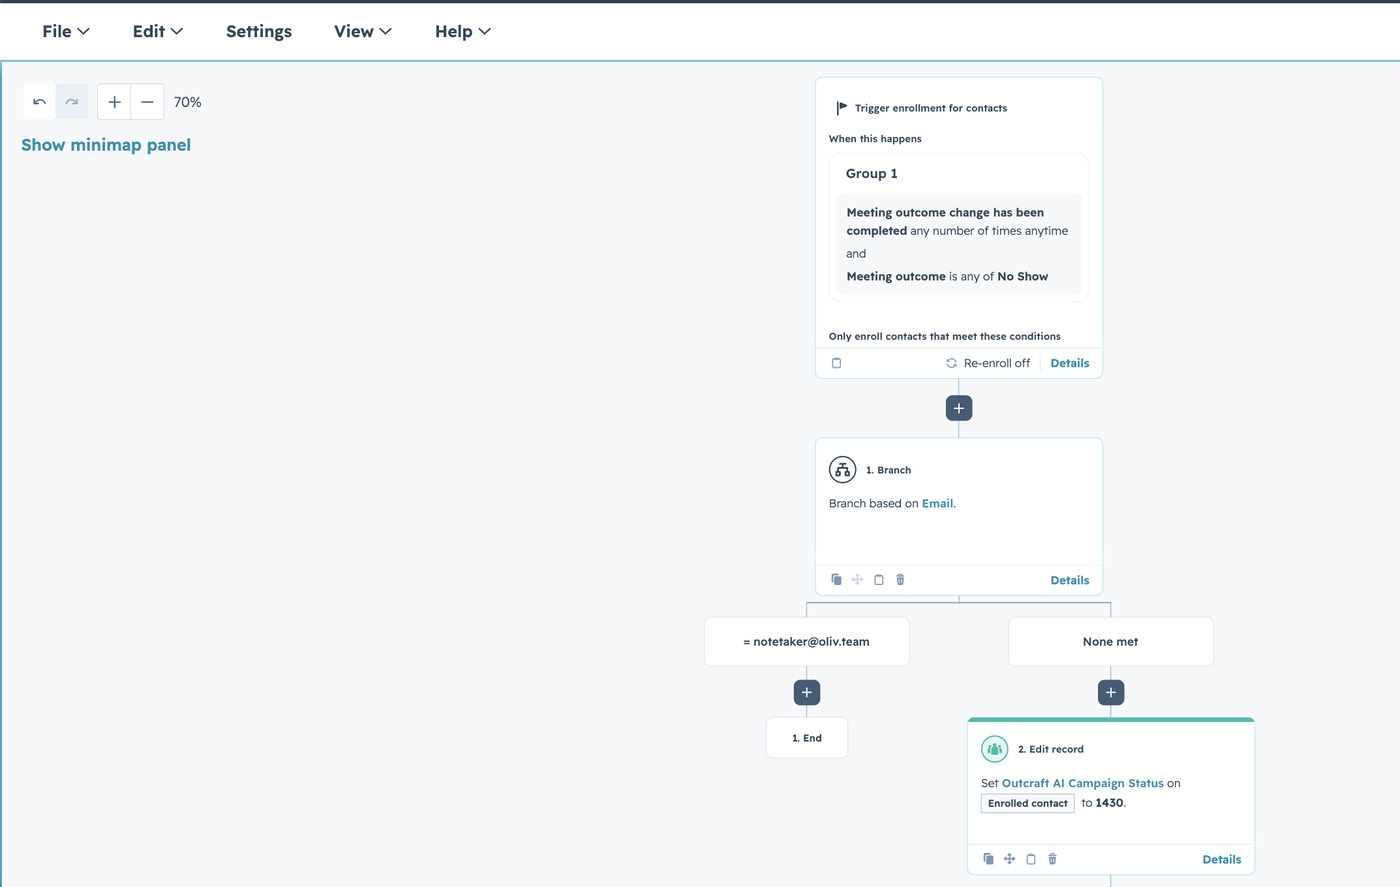
To automate: build a HubSpot Workflow that sets that property when your trigger fires (lifecycle stage change, deal status, form submit, meeting outcome, etc.).
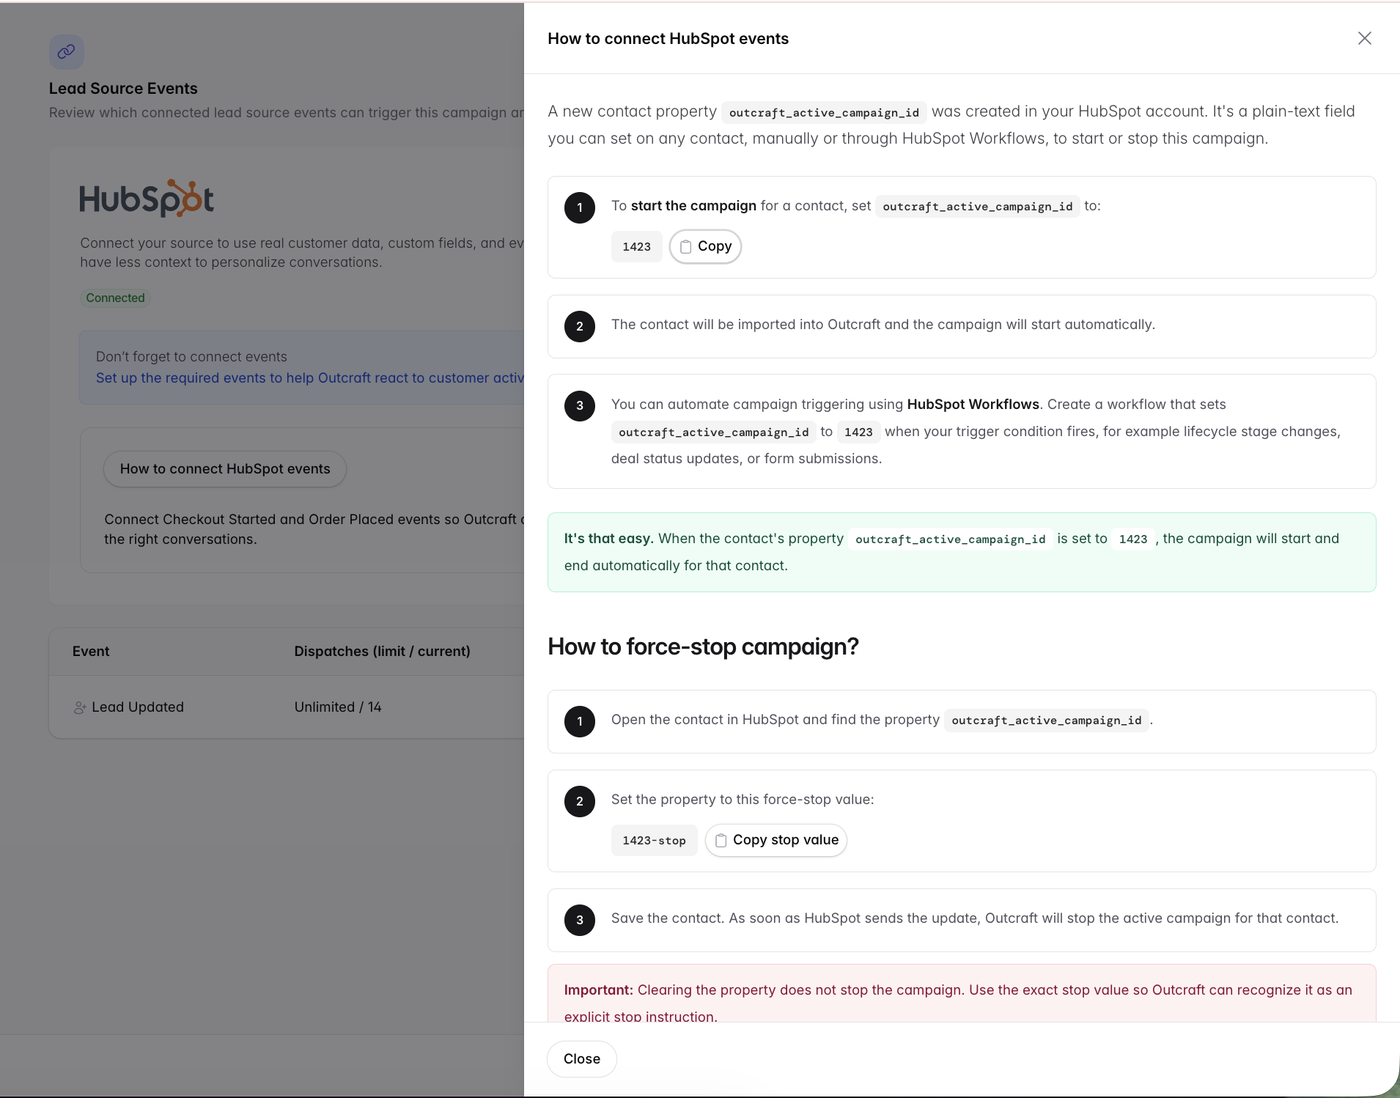
HubSpot Workflows Example
⚠ Watch out The stop gotcha that generates the most tickets: clearing the property does not stop the campaign. To force-stop, set the property to the exact stop value (e.g. 1423-stop). Outcraft only treats that exact value as a stop instruction. |
4.3 Klaviyo
Klaviyo is a common lead source for e-commerce campaigns. After connecting it, Outcraft shows an in-app guide for creating the webhook-triggered flows that send leads in — typically an Abandoned Cart (checkout-started) flow and an Order Placed flow. As with Shopify, the Order Placed flow is what stops outreach to customers who have already bought.
Connecting Klaviyo usually needs a developer or admin with Klaviyo access. Click Connect, authorize Outcraft, then follow the in-app webhook instructions.
Finish — Review & Launch
Once everything above is set, click Review and Publish.

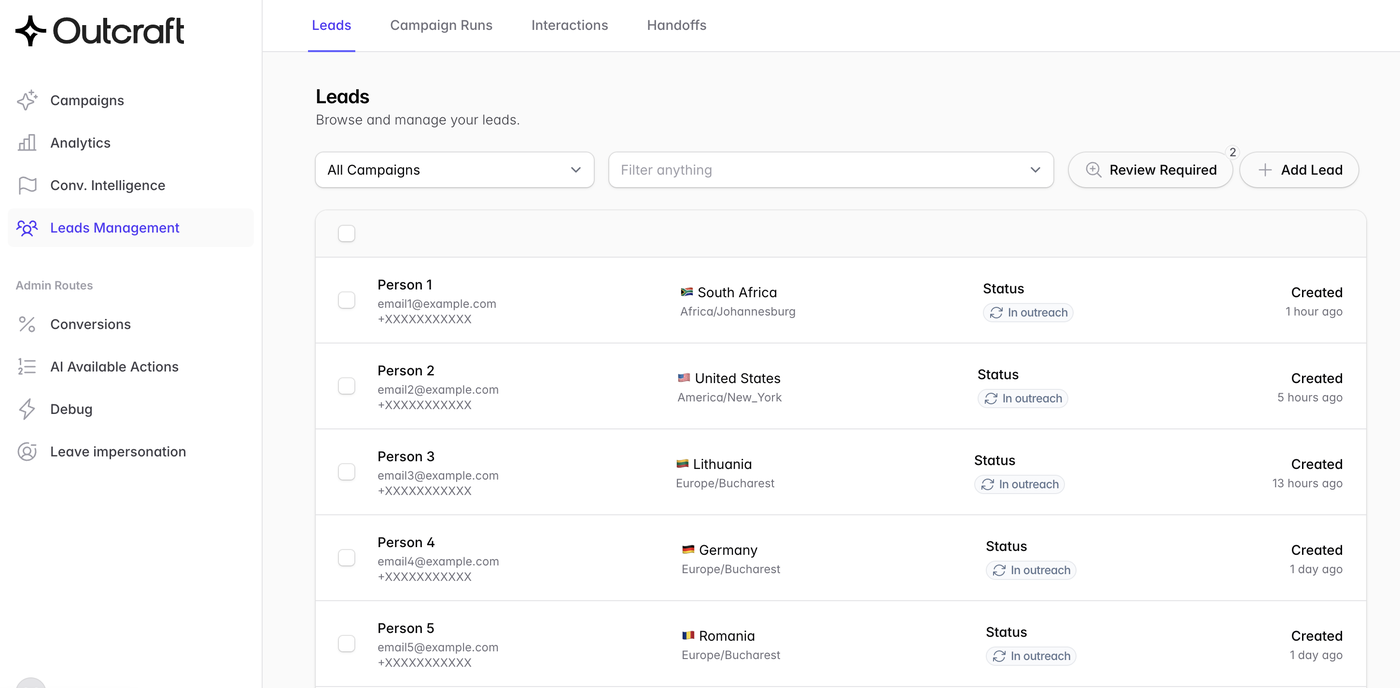
Then, check the leads flow into Leads Management, each showing country, inferred timezone, and status (e.g. “In outreach”). Watch the Review Required count, and use the Campaign Runs, Interactions, and Hand-offs tabs to confirm the agent is behaving as expected.
Test before you launch. Run the campaign against sample leads first (a batch of ~50 is plenty) and have your own team take the calls. Go live only once it consistently handles your real scenarios. Evaluations and summaries are not retroactive, so set them up before launch.
How conversions are attributed. Outcraft reports two buckets. Converted (high-confidence) means the lead used the campaign's unique code, clicked the link in the agent's follow-up text or email, or had a positive conversation of ~45 seconds or more and then purchased within 24 hours. Assisted means the lead engaged but the purchase can't be tied as directly to Outcraft. A unique discount code keeps attribution clean.
✓ How to verify Pre-launch checklist: (1) at least one US + one EU number added; (2) mailbox shows connected; (3) Shopify dispatch counter ticking up or HubSpot property sets correctly; (4) booking link passes Check Booking Link (if used); (5) a Test Call sounds right. If all pass, launch. |