CheckoutChamp Setup Guide
Last updated: August 13, 2026
How to connect CheckoutChamp to an Outcraft AI campaign
What this is
CheckoutChamp does not have an abandoned cart event. CheckoutChamp has a Partial order instead. A Partial order is a record. CheckoutChamp makes this record when a shopper gives contact details but does not pay. Outcraft uses the Partial order as the abandonment signal.
CheckoutChamp sends data with Postback Export Profiles. A profile tells CheckoutChamp to send a set of fields to a URL when an order occurs. You make one or two profiles. Each profile points to a URL. The URL is unique to the Outcraft campaign.
Abandoned cart campaigns use two events and two profiles:
Profile | When it fires | Result in Outcraft |
|---|---|---|
Outcraft Partial Orders | The shopper gives details but does not pay | Starts the recovery campaign |
Outcraft Completed Orders | The order is paid | Stops the campaign. The shopper has bought. |
Post-purchase campaigns need only the second profile.
IMPORTANT Each Outcraft campaign has a unique postback URL. Three Outcraft campaigns need three sets of profiles. Give each set a different name, for example Outcraft Partial — Summer Sale. Different names keep the sets easy to identify. |
Before you start
☐ A CheckoutChamp login with access to Admin → Export. Use a merchant admin login, not a sub-account.
☐ An Outcraft campaign that already exists. Set its type to Recover Checkout or Post Purchase.
You do not need an API key, an integration user, or an IP whitelist. This integration uses postbacks only.
Part 1 — Get the postback URL from Outcraft
Open the campaign. Go to Onboarding → Apps → CheckoutChamp.
If the page is empty, click Set Up CheckoutChamp on this campaign. Outcraft then makes the unique postback URL for the campaign.
Click How to connect CheckoutChamp events. The panel shows the Postback URL and all values used in this guide. Click a value to copy it.
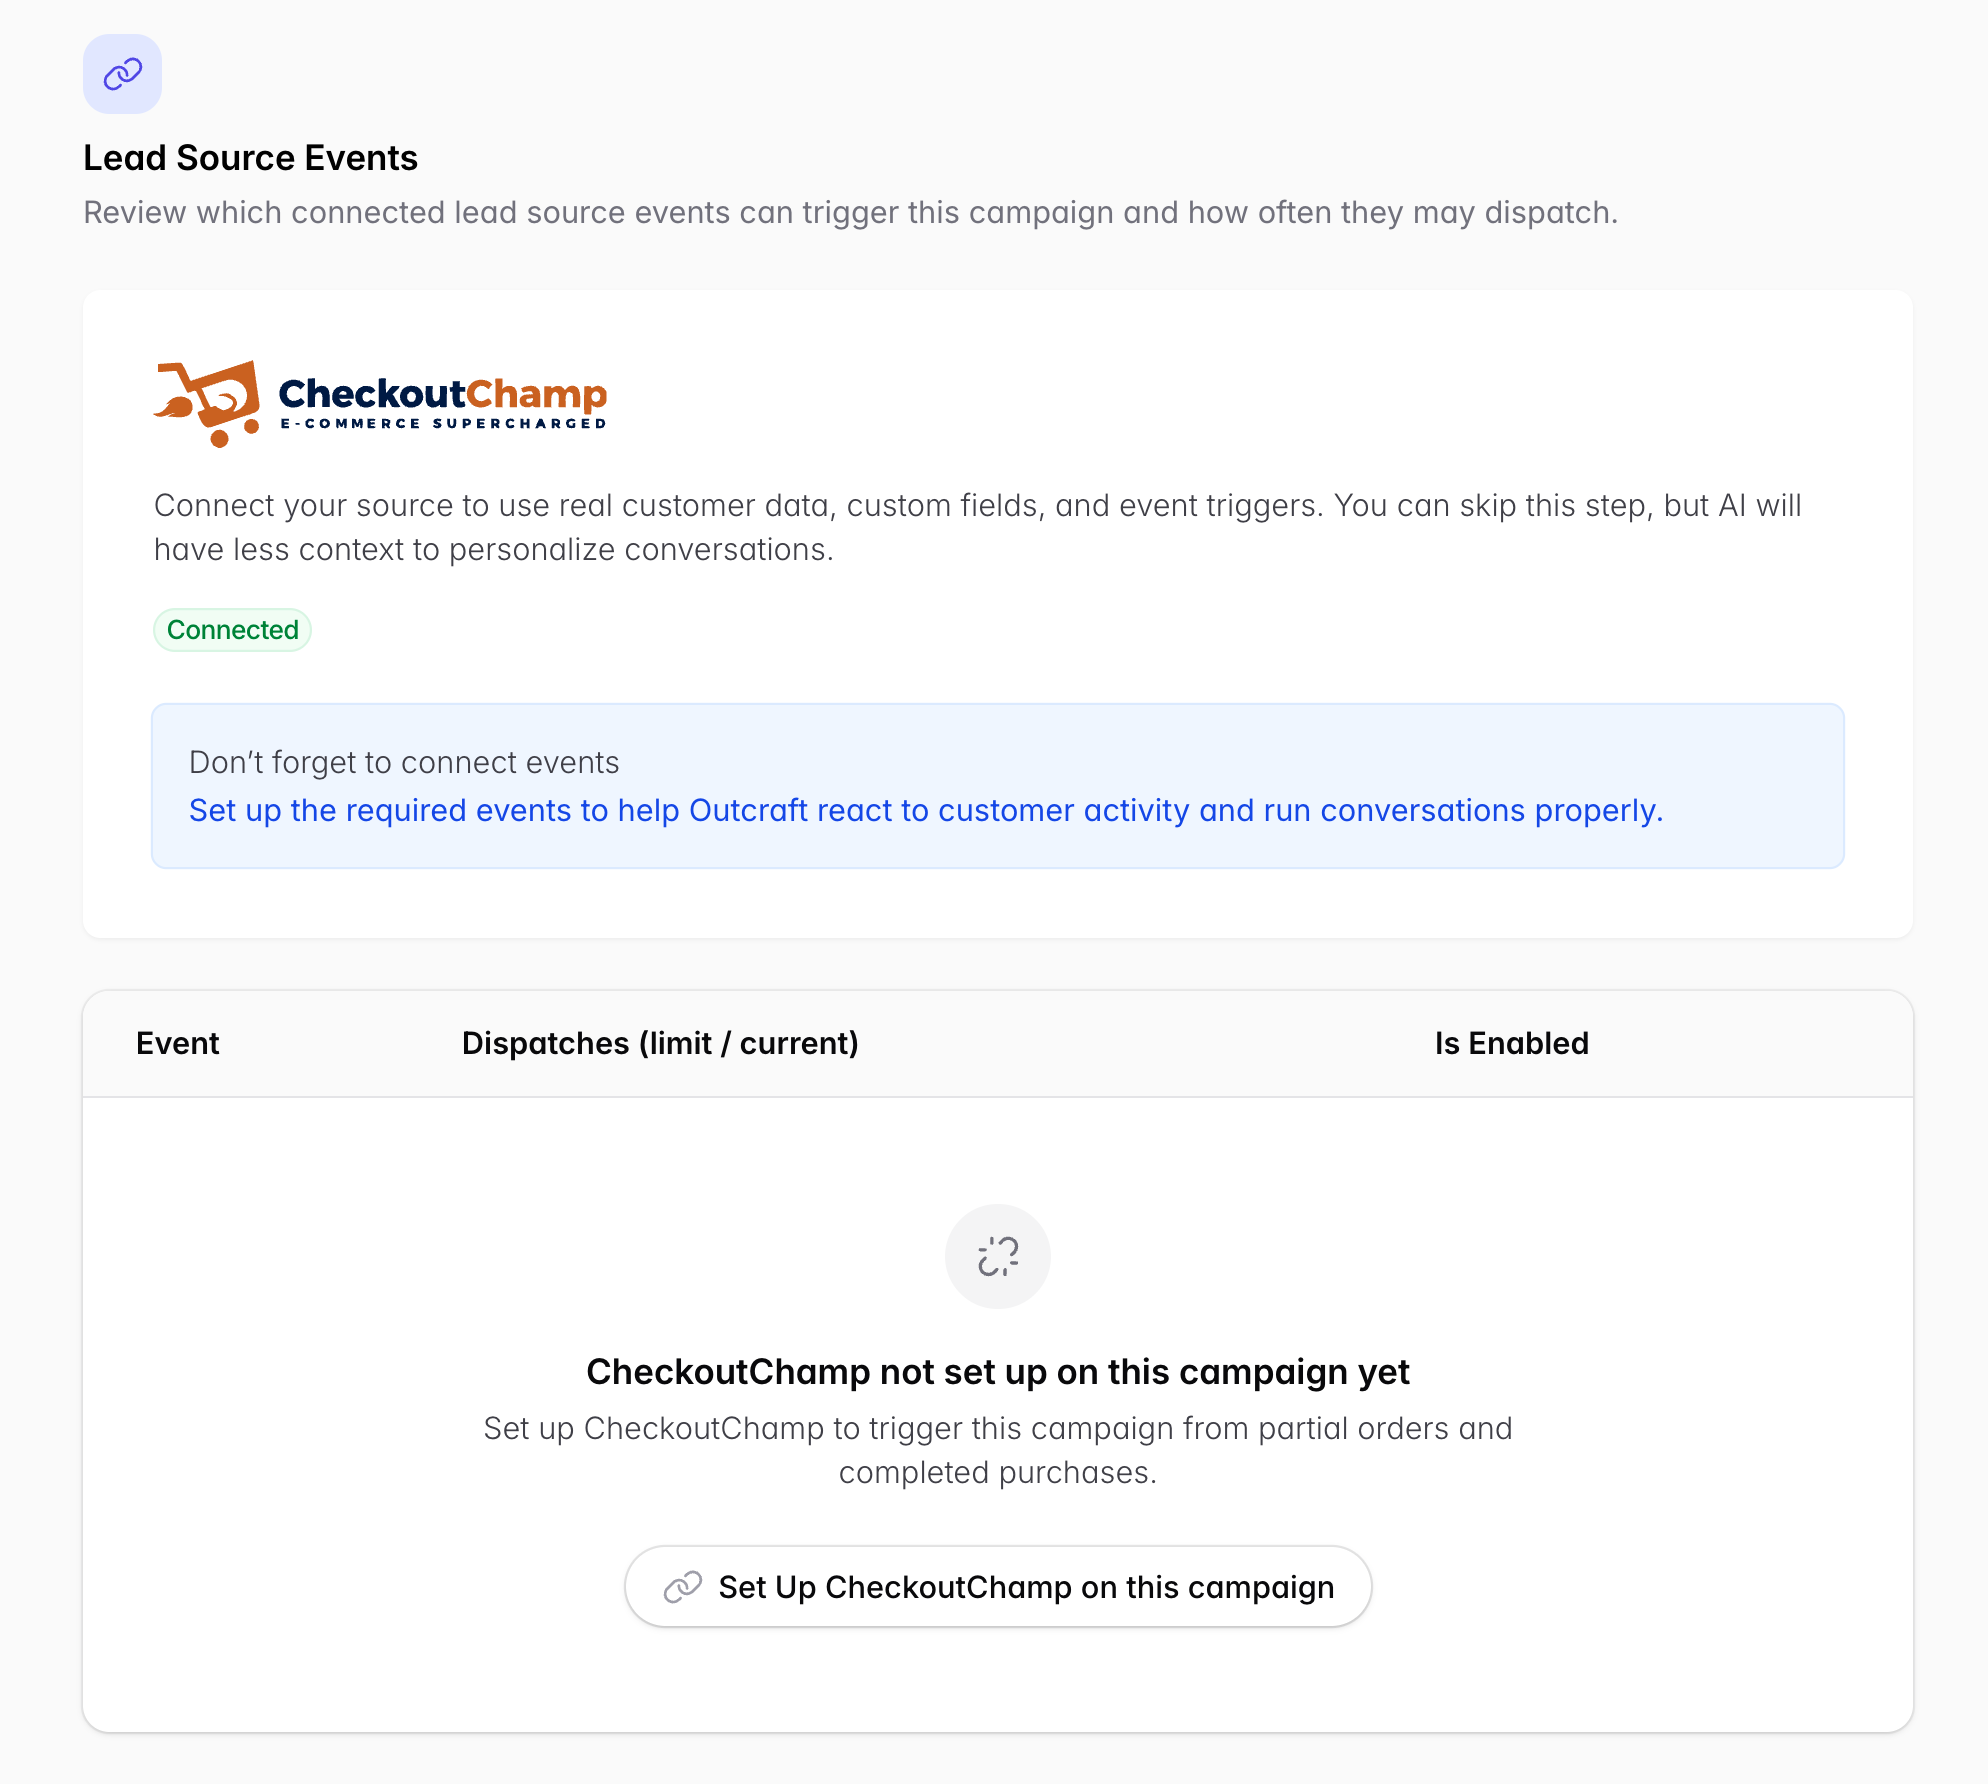
Figure 1 — Before setup. Click Set Up CheckoutChamp on this campaign.
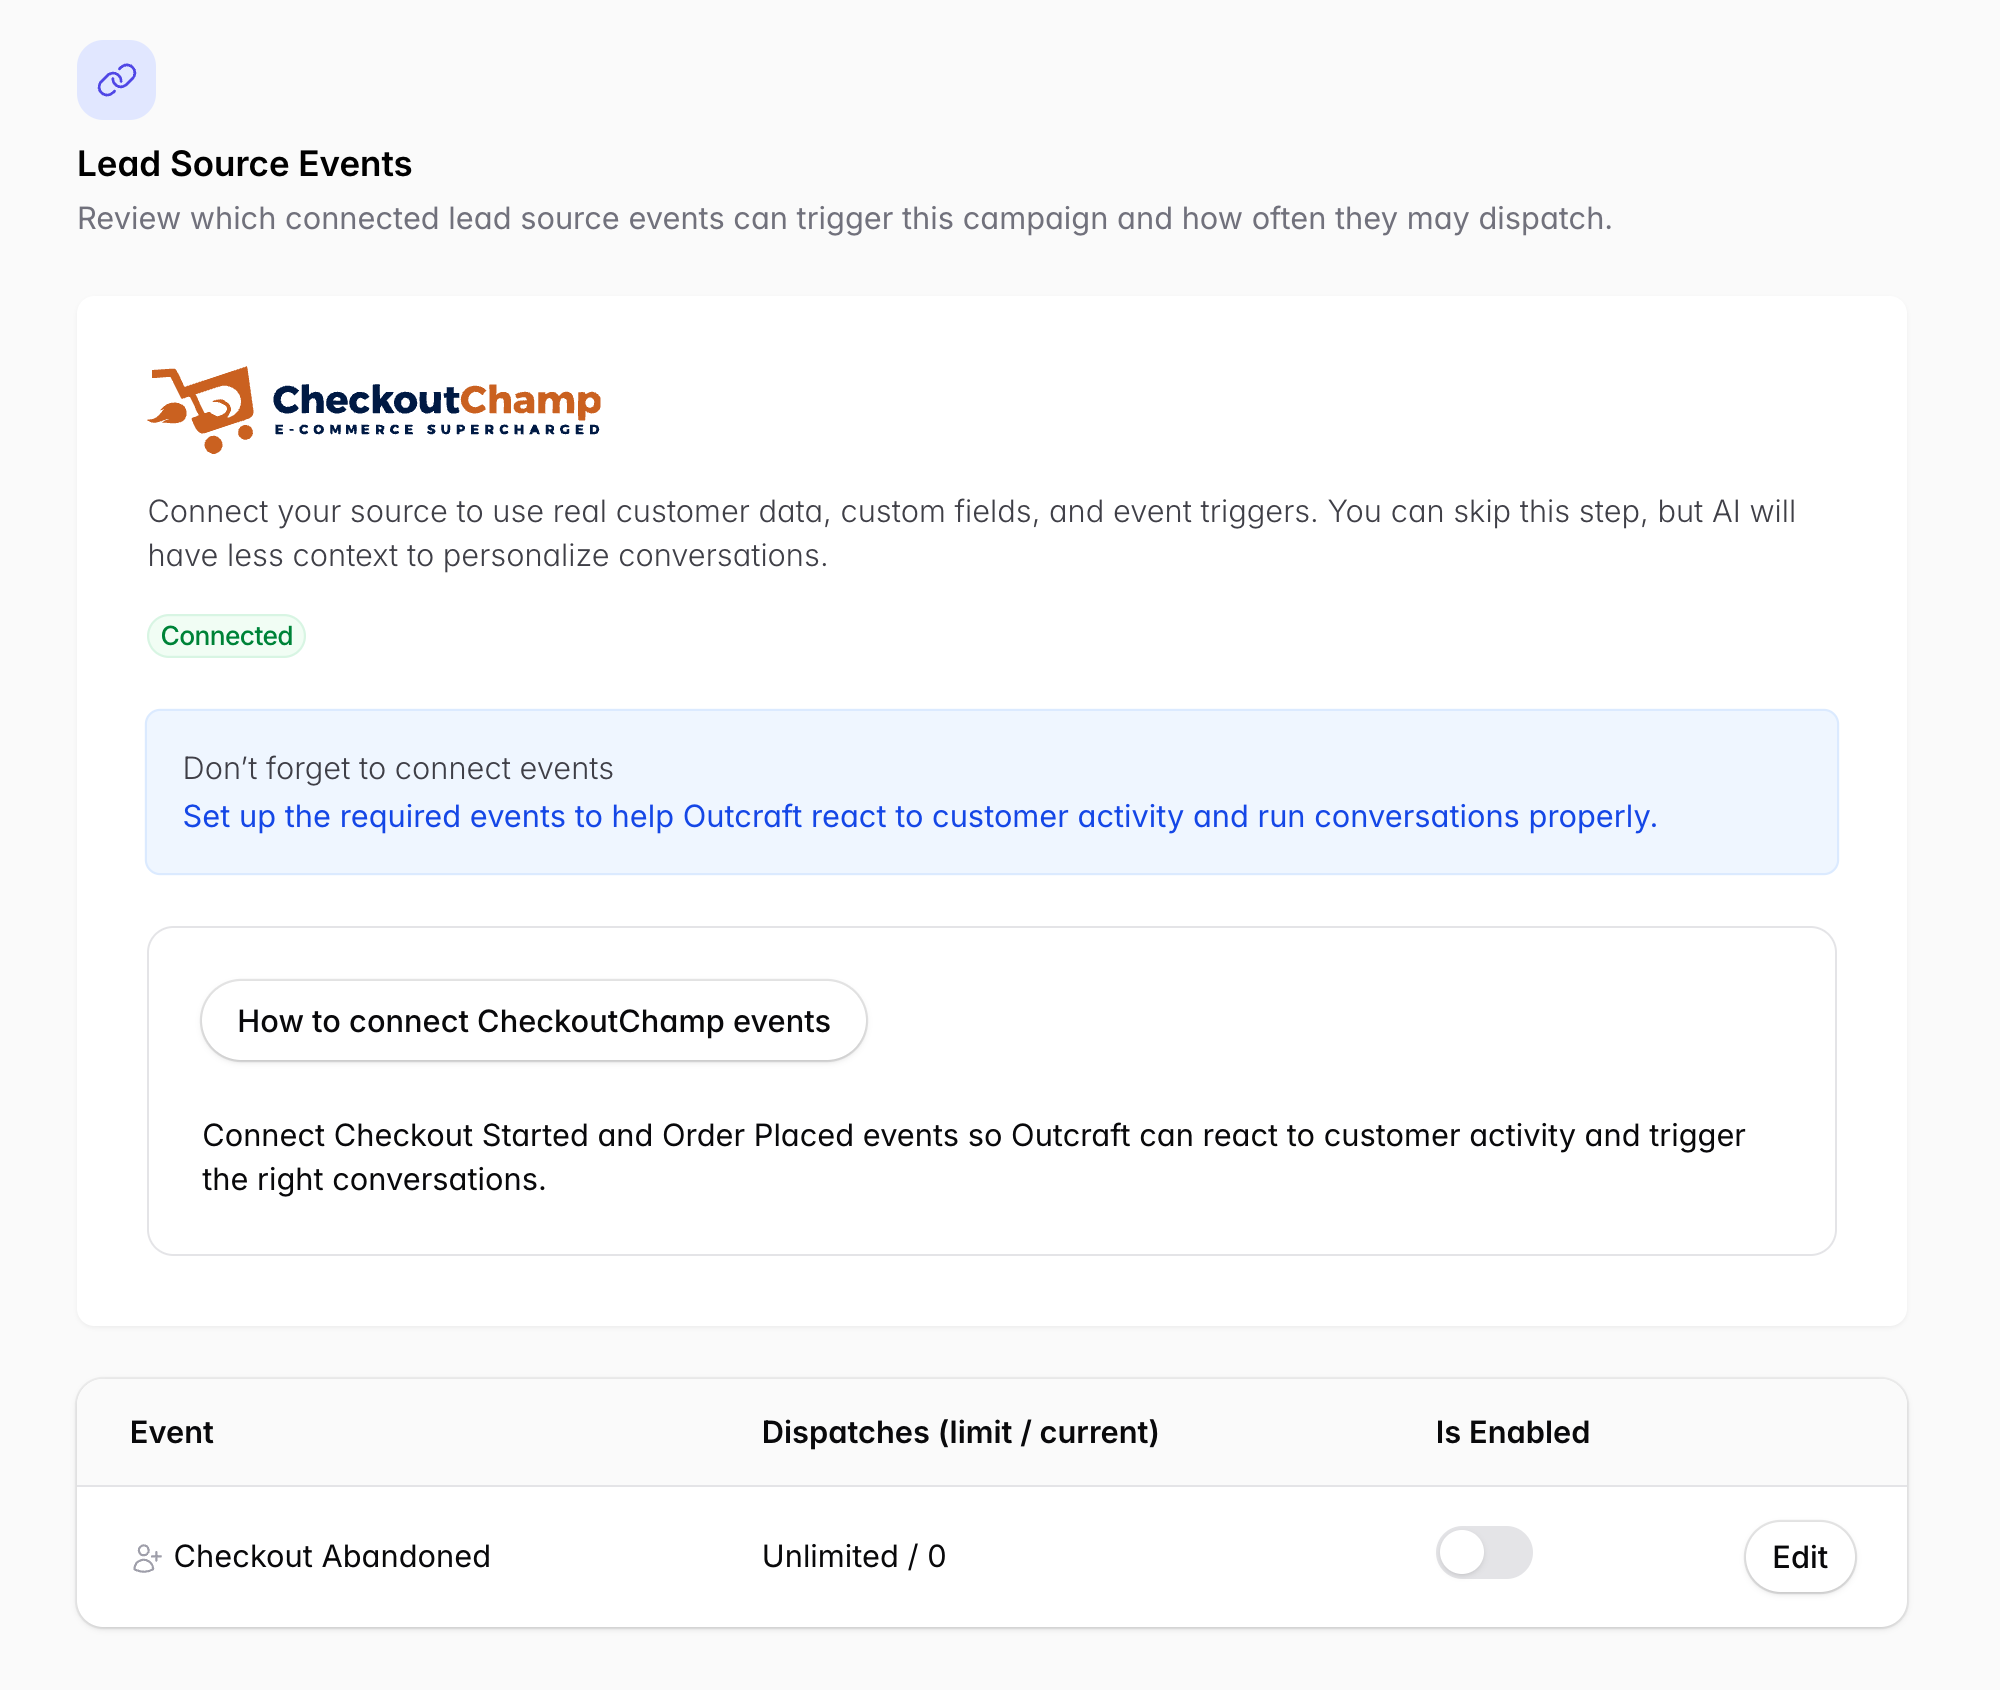
Figure 2 — After setup. The Postback URL and all values are behind How to connect CheckoutChamp events. Turn on the Is Enabled toggle at the bottom in Part 8.
KEEP THE TOGGLE OFF FOR NOW Keep the Is Enabled toggle off until the end. Turn it on only after you confirm that the profiles work. |
Part 2 — Create the export profile in CheckoutChamp
In CheckoutChamp, go to Admin → Export.
On the Export Webhook Profiles panel, click the green + button. Set Export Type to Postback. Save the profile.
Click the blue pencil on the new profile to open its settings. Do Parts 3 to 5 on this screen.
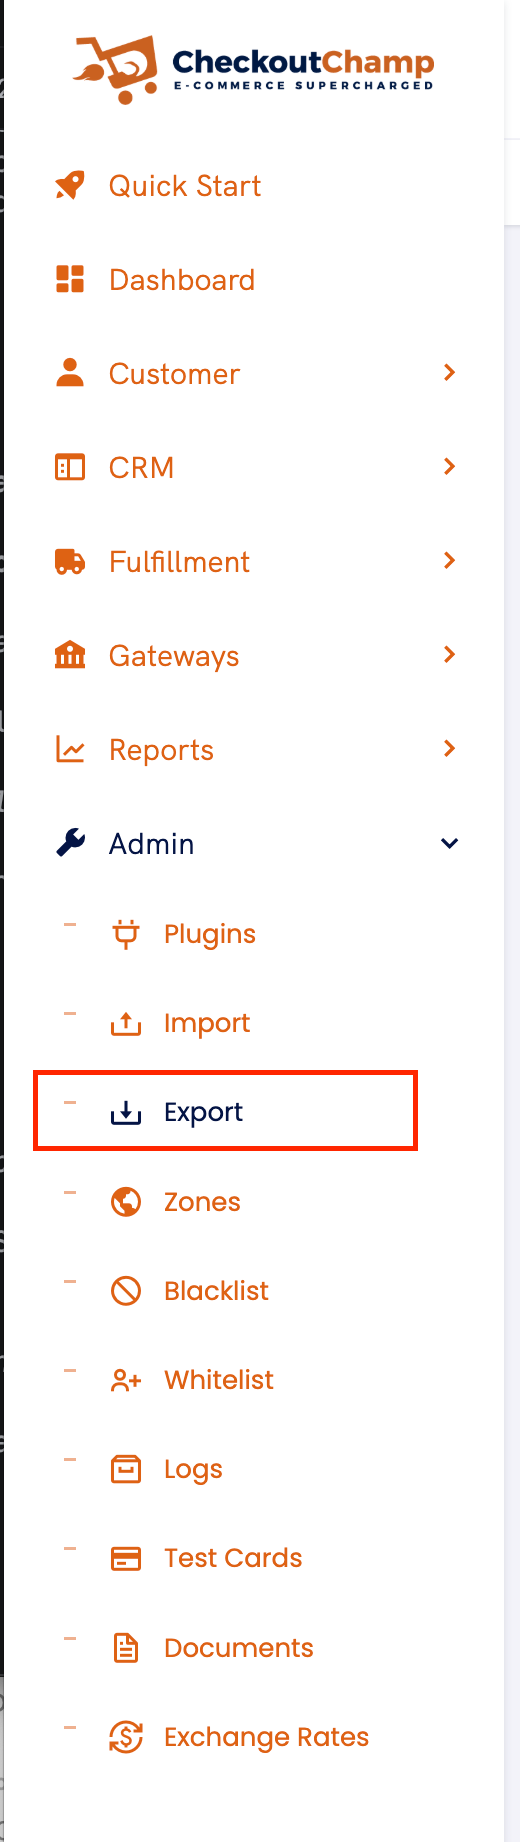
Figure 3 — Admin → Export in the CheckoutChamp sidebar.
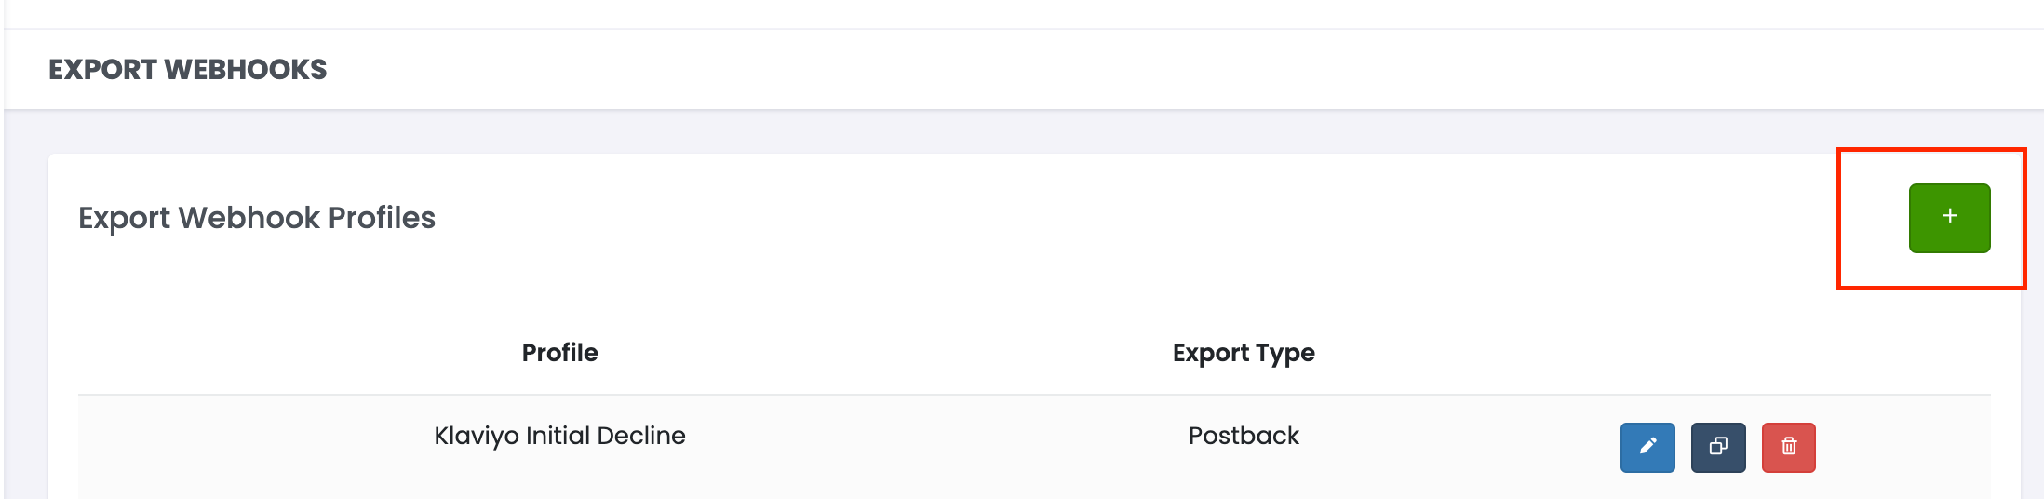
Figure 4 — The green + button makes a profile. On each row, the blue pencil edits, the dark icon duplicates, and the red icon deletes.
CHECKOUTCHAMP DOCUMENTATION CheckoutChamp documents postback export profiles here: help.checkoutchamp.com/crm/admin-setup/export-webhook-profiles/postback-export-profiles |
Part 3 — General settings
Field | Value |
|---|---|
Profile Name | Outcraft Partial Orders or Outcraft Completed Orders |
Export Type | Postback (already set in the previous step) |
Postback URL | Paste the URL that you copied in Part 1. |
Export Delay | Leave empty |
Click Update.
WHY EXPORT DELAY STAYS EMPTY CheckoutChamp batches exports on an approximately 15 minute cycle. A value in Export Delay adds more time to this cycle. More time delays the first recovery message. |
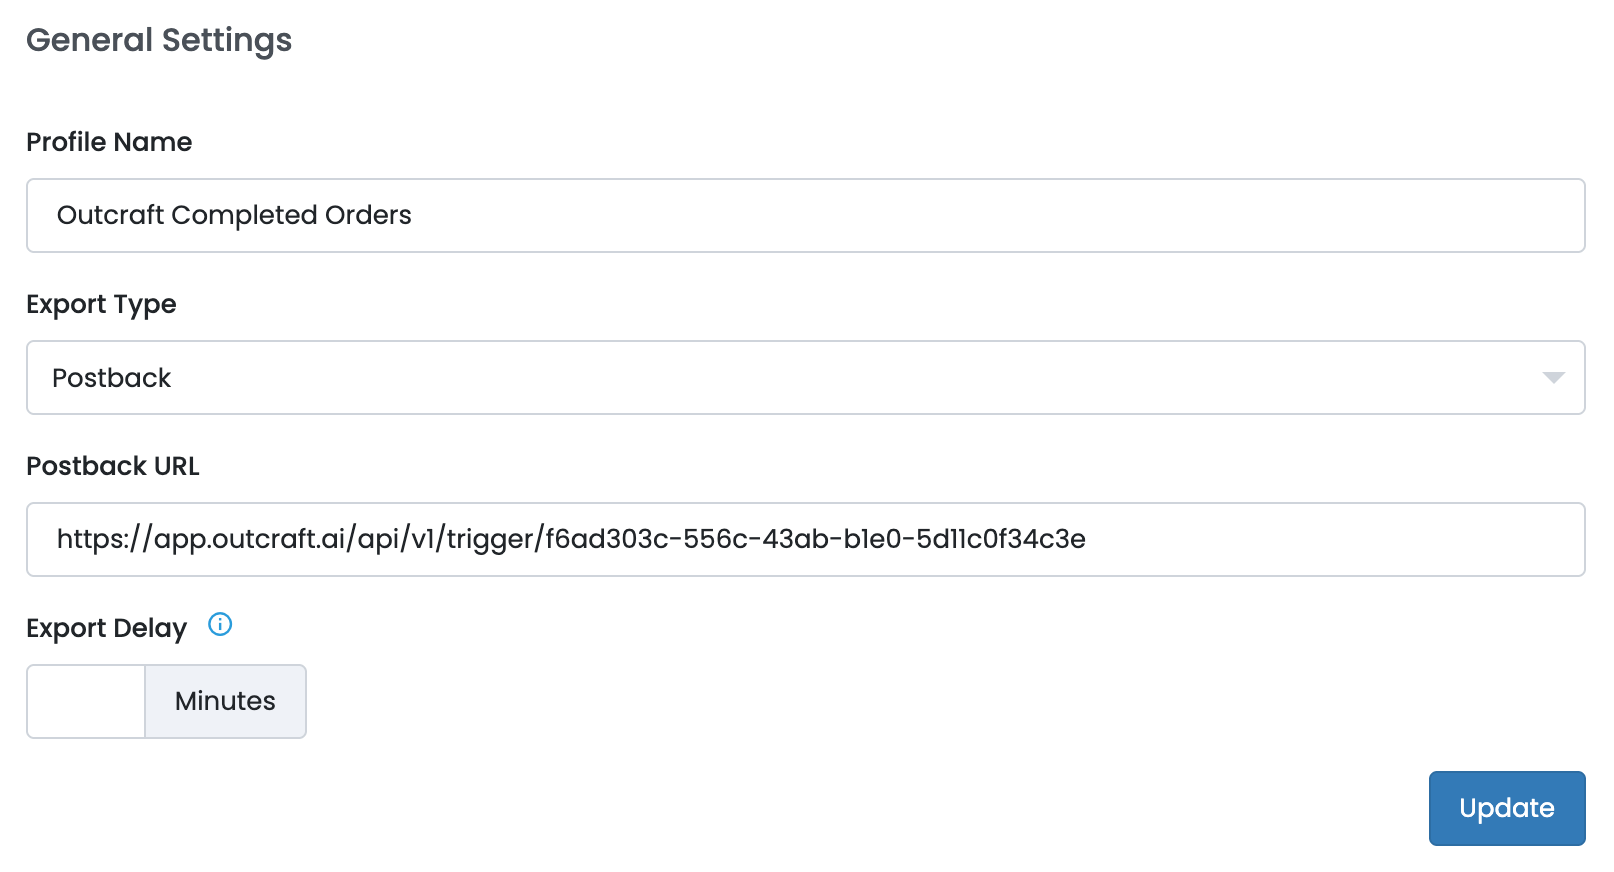
Figure 5 — General Settings on an export profile.
Part 4 — Static field mappings
In the Field Mappings panel, click the green + button. Add the three rows below. For each row, set Field to Static. Type the value into Static Value.
Export Name | Field | Static Value |
|---|---|---|
header:httpMethod | Static | POST |
header:Content-Type | Static | application/json |
outcraft_event | Static | see below |
The first two rows make CheckoutChamp send JSON, not a form post. The third row tells Outcraft which event the profile is for. The outcraft_event value is the only field that is different between the two profiles:
Profile | outcraft_event value |
|---|---|
Outcraft Partial Orders | checkoutchamp/partial/created |
Outcraft Completed Orders | checkoutchamp/order/completed |
Part 5 — Data field mappings
Add one row for each line below. Type the Export Name exactly as shown. Select the matching Field from the dropdown. Click Update after you add all ten rows.
Export Name | Field |
|---|---|
unique_id | orderId |
order_date | dateCreated |
first_name | firstName |
last_name | lastName |
emailAddress | |
phone | phoneNumber |
country_code | country |
final_price | orderTotal |
cart_link | salesUrl |
customer_id | customerId |
EXPORT NAMES ARE CASE-SENSITIVE The Export Names are case-sensitive. They must match exactly. Unique_ID does not work. Copy the names from the Outcraft instructions panel. Do not type them by hand. |
Give attention to two mappings:
cart_link (salesUrl) — the AI sends this link to the shopper. If the store does not fill this field, the AI has no link to send. Check this field against a real partial order before you go live.
phone — the AI needs a phone number to contact the shopper. Outcraft discards orders that have no phone number.
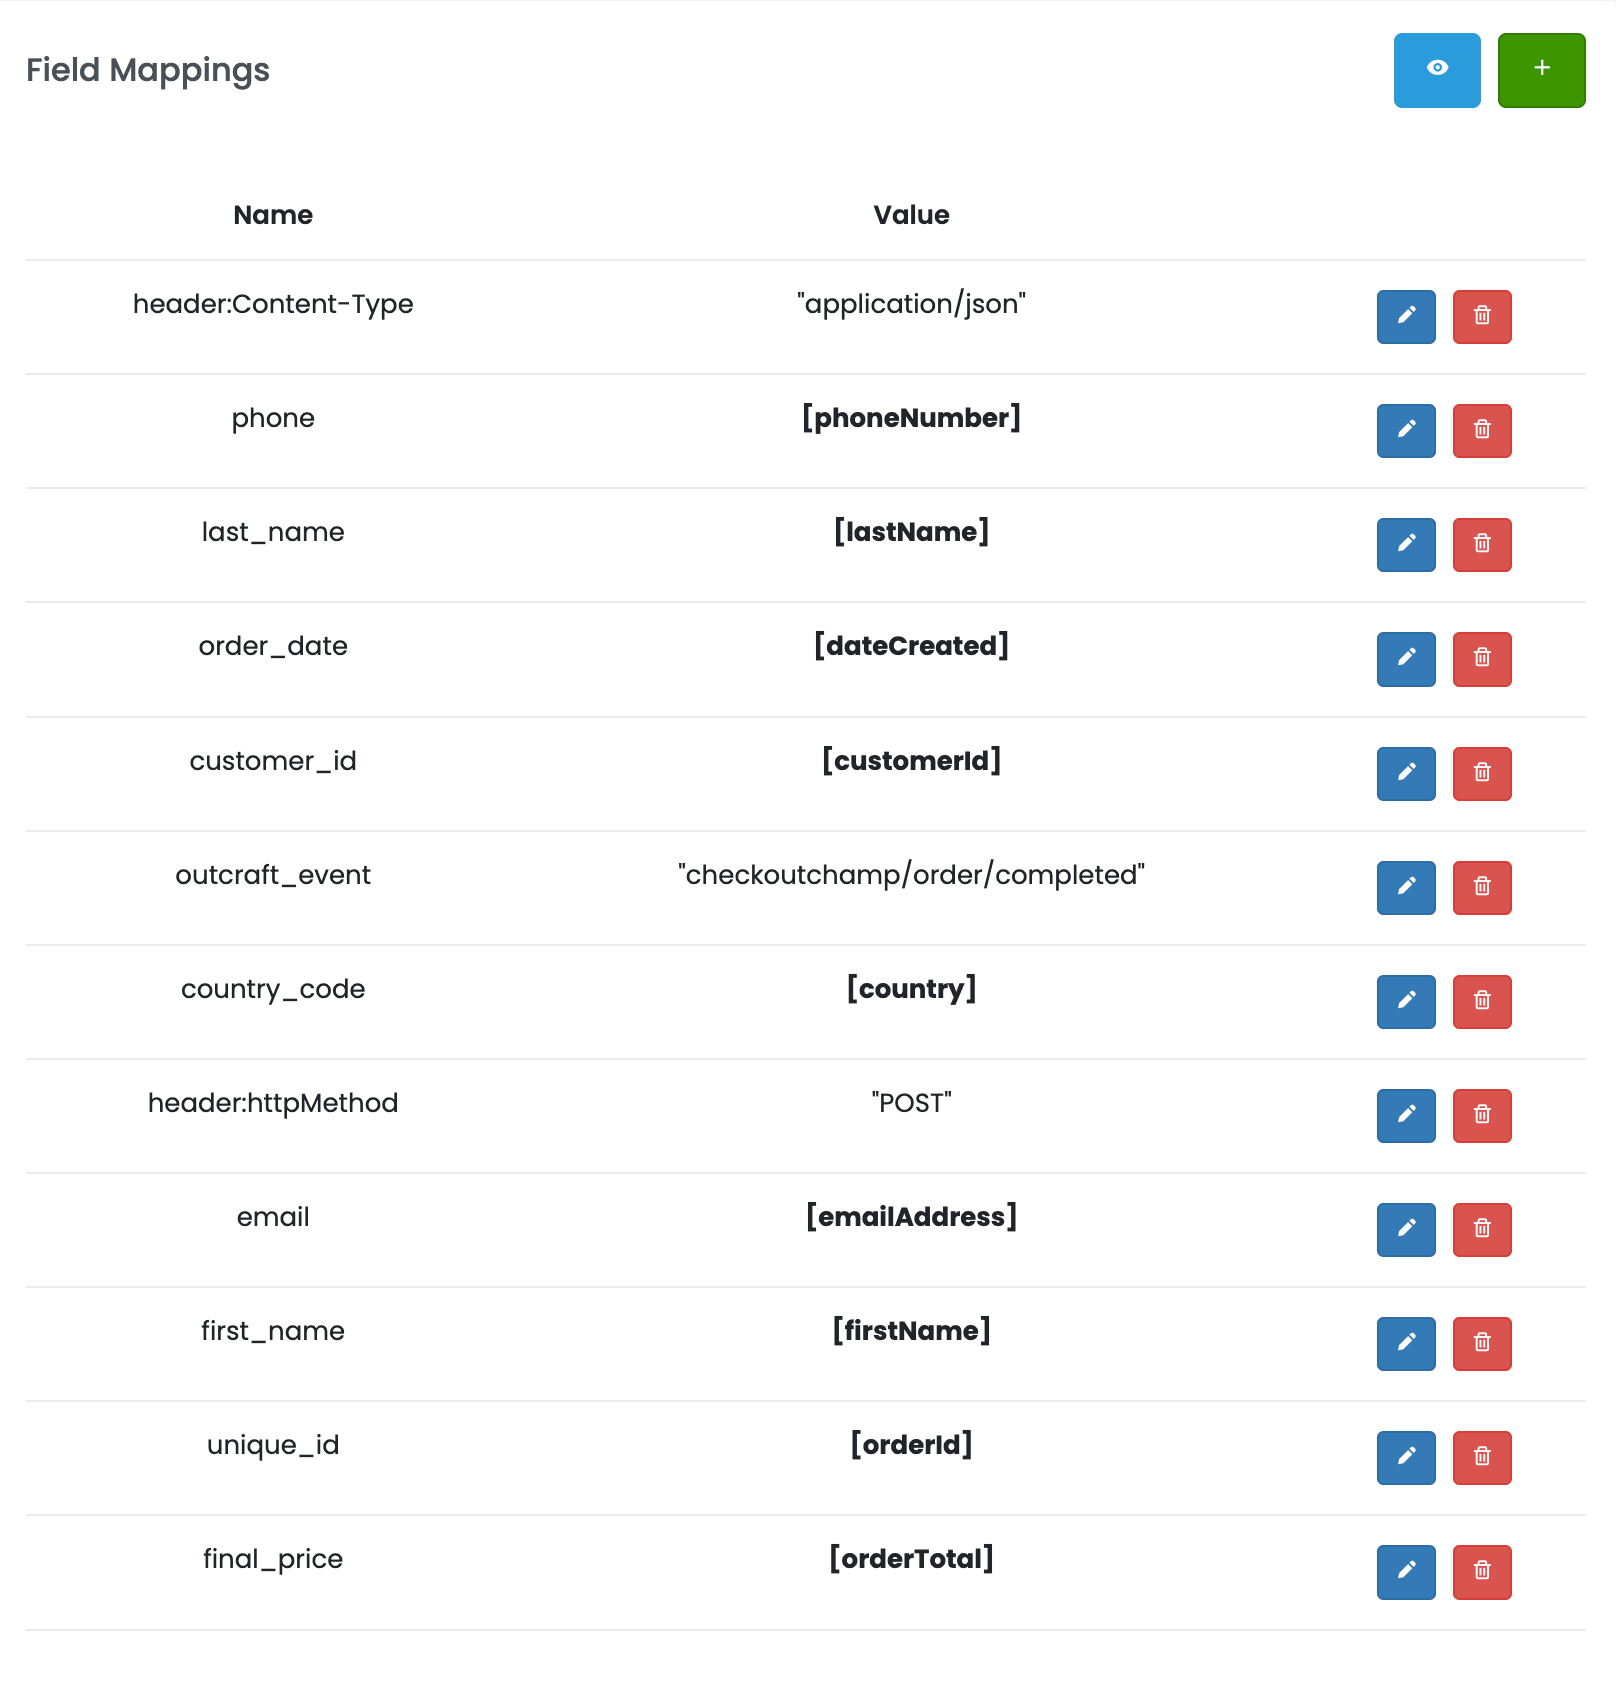
Figure 6 — The complete Field Mappings panel. Compare your panel to this before you continue.
Part 6 — The second profile
This part applies to abandoned cart campaigns only. Post-purchase campaigns skip this part.
The second profile is the same as the first, except for its name and one mapping value:
Field | Value |
|---|---|
Profile Name | Outcraft Completed Orders |
outcraft_event static value | checkoutchamp/order/completed |
All other settings stay the same. This includes the postback URL, both header mappings, and all ten data mappings.
A QUICKER METHOD You do not need to build the second profile from the start. Click the duplicate icon on the first profile in the Export Webhook Profiles list. This is the dark button next to the blue pencil (see Figure 4). Open the copy. Rename it. Change the outcraft_event static value in its mappings. All other settings are already correct. |
Part 7 — Profile routing
Users miss this step most often. A profile alone does nothing. Profile routing decides which orders start the profile. Profile routing is a separate panel on the Export Webhooks page. This panel is to the right of the profiles list.

Figure 7 — Two separate panels. Export Webhook Profiles is on the left. Profile Routing is on the right. Use the green + that is marked.
Click the green + on the Profile Routing panel. Add one route for each profile:
Profile | Customer Type | Product | Campaign |
|---|---|---|---|
Outcraft Partial Orders | Partial | All Products | All Campaigns |
Outcraft Completed Orders | New Sale | All Products | All Campaigns |
Keep Campaign as All Campaigns. Change it only if one specific CheckoutChamp campaign must start this Outcraft campaign.
DO NOT USE “ABANDONED CART” The dropdown includes an Abandoned Cart customer type. This type produces no events. Use Partial instead. |
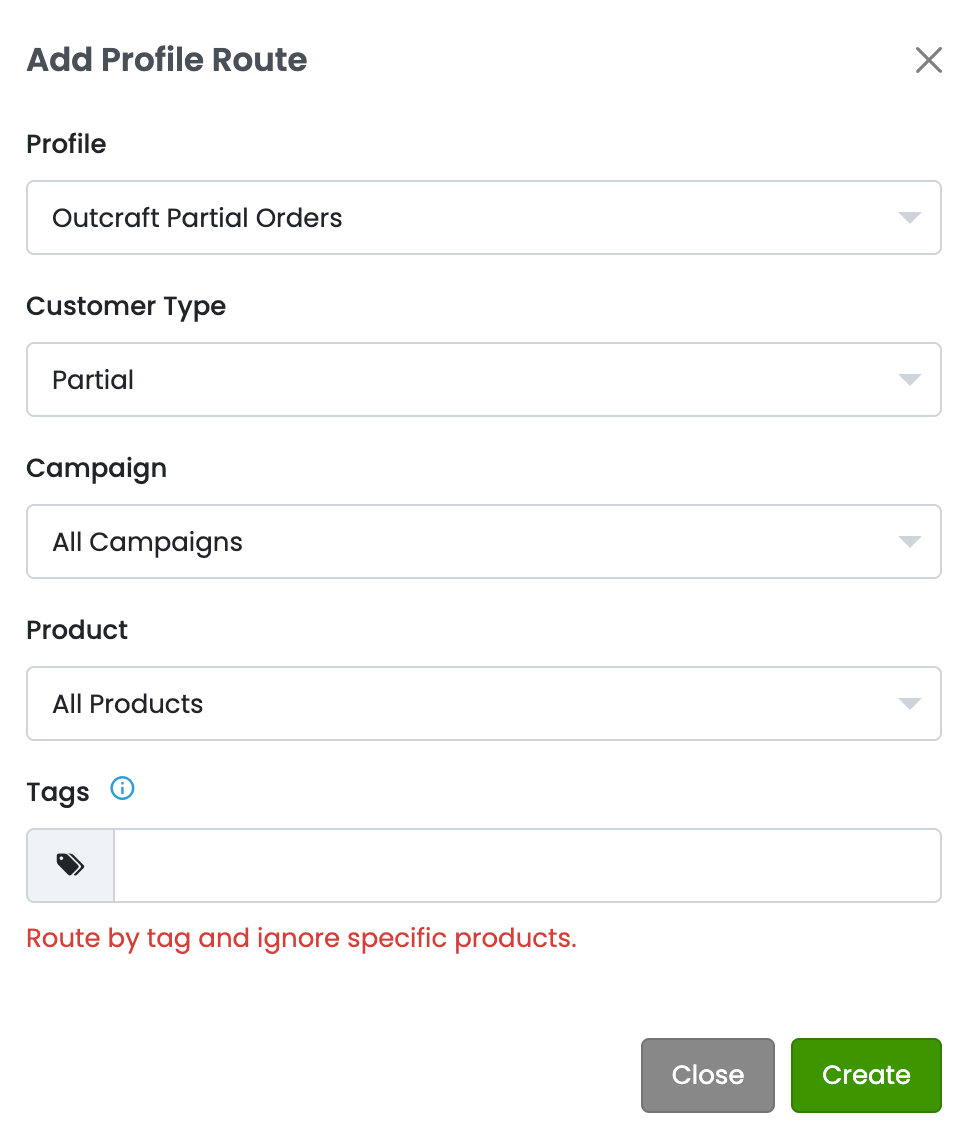
Figure 8 — The Partial route.
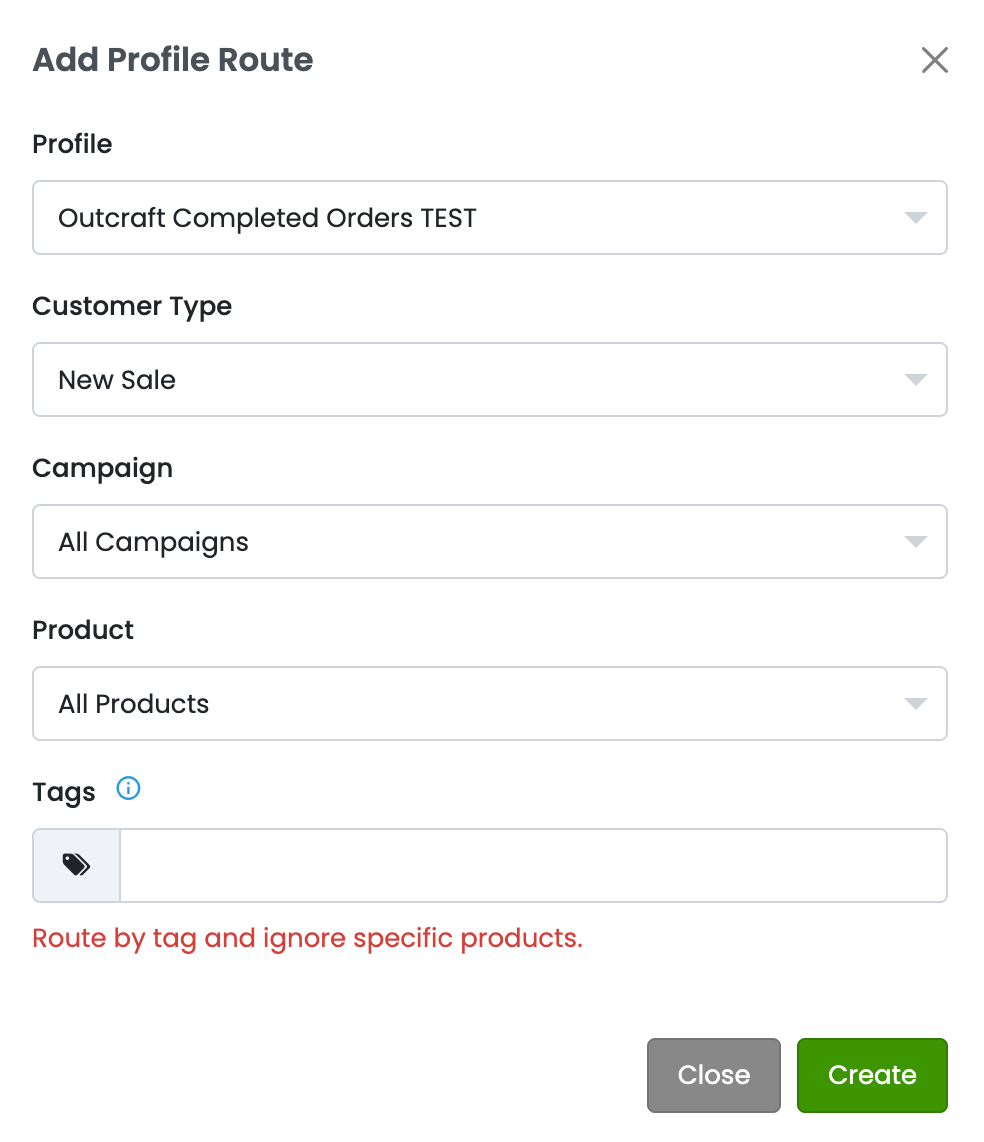
Figure 9 — The New Sale route.
Part 8 — Turn it on
Go back to the campaign’s CheckoutChamp page in Outcraft. Turn on Is Enabled in the Lead Source Events table. Figure 2 shows this row.
The campaign must also be published. No events fire before you publish the campaign.
What happens right after you turn it on
When you create an export profile, CheckoutChamp replays the last 24 hours of orders. CheckoutChamp sends these orders in batches of approximately 100 events per export cycle. A store with many orders can need several hours to send this backlog. During this time, the store has not yet reached the current orders.
Outcraft ignores any event for an order that is more than 2 hours old. Outcraft receives and logs these events during the backlog, but it starts no campaign and contacts no shopper. This behavior is deliberate. Without it, every shopper who abandoned a cart yesterday would get a message today.
The result is important. After you complete the setup, the integration can appear inactive for a few hours. Outcraft receives and logs events during this whole time. After CheckoutChamp sends the backlog and reaches live orders, the campaigns start normally.
YOU CANNOT MAKE THIS FASTER The 24 hour replay and the batch size are CheckoutChamp behaviors. CheckoutChamp has no setting to disable them. To reduce the backlog, connect during a quiet period. A quiet period has less history to send. |
Timing once it is live
Stage | When |
|---|---|
The shopper abandons the checkout | T + 0 |
CheckoutChamp exports the partial order | Up to 15 min |
Outcraft waits before the first contact | 45 min |
The first message reaches the shopper | Approximately 1 hour |
The 45 minute wait is deliberate. The CheckoutChamp export cycle makes the paid event arrive up to 15 minutes late. The wait prevents Outcraft from contacting a shopper who has already bought.
Troubleshooting
Symptom | Likely cause |
|---|---|
No data arrives | You did not set up Profile Routing. A profile alone does nothing (Part 7). |
No data arrives, but routing looks correct | You used Abandoned Cart, not Partial, as the Customer Type. |
Events arrive, but Outcraft creates no leads | An Export Name has a typo, or the phone mapping is missing. |
No campaign starts for the first few hours | This is normal. CheckoutChamp still sends the 24 hour backlog (see above). |
The campaign starts, but the AI has no cart link | The cart_link → salesUrl mapping is missing, or the store does not fill salesUrl. |
Outcraft contacts shoppers after they buy | The second profile or its route is missing, or its outcraft_event value is wrong. |
Delays are much longer than an hour | Export Delay has a value, or the store export queue is full. |